Showing posts with label Daring Bakers. Show all posts

Wednesday, August 31, 2011

Daring Bakers & Happy 40th Birthday Chez Panisse!


I am back but still so tired, it took me a week to get over the jet lag so I felt a little overwhelmed to post anything.  Two months of absence took a toll at my house and garden so I am slowly getting back to a routine and it feels good to be back.  Having missed two past daring baker challenges while in Venice, I had planned to participate to the daring bakers' August challenge which was to make candy, both chocolate and not.  I even purchased strawberries to make some paté de fruit, but after reading the recipe I realized i needed liquid pectin so I decided to give up.  I still wanted to make something with chocolate and since last weekend the restaurant Chez Panisse celebrated its 40th year in business, I made these little chocolate candy I learned to make when I was doing an internship in their pastry department.  They are called nut jobs (don't you love the name?).

The daring bakers were challenged to temper chocolate among other things.  I thought I knew how to temper chocolate, but after following the instruction to the letter, I learned that I was always heating it too much (note to self: always use a thermometer when tempering chocolate), so this time the chocolate turned out perfect and it didn't bloom at all.  Can you see the shine on the chocolate?

Excuse the random pictures, this was taken at dawn, from my bedroom window.
 
I learned an incredible amount while working at Chez Panisse.  The recipes there are simple but amazing, and they are so generous and willing to share them.  The techniques they use are impeccable, and I came home with lots of tricks and knowledge.  One fundamental thing I learned is how to handle fruit.  I was there in the spring and part of summer so I had the pleasure to work with berries and stone fruit.  Now when I pick a peach to check it for ripeness I always think of Mia Ponce, whose knowledge and patience were invaluable.  Read more about this amazing restaurant from one of its past chefs, David Lebovitz, here and here.

Same place, the clouds reflection in the water

Nut Jobs
adapted from Chez Panisse

3.5 oz sliced almonds, toasted
1 oz other nuts, toasted ( I used pistachios)
6 oz bittersweet chocolate
6 oz semisweet chocolate

Melt and temper the chocolate (see the daring baker instructions).  Add the nuts and spread onto a 1/4 sheet pan lined with plastic wrap (spread to 3/4 of the pan, otherwise they will be too thin).  Let set in the refrigerator before cutting it into pieces.  Store in an airtight container.

Friday, May 27, 2011

Daring Bakers-Chocolate Marquise


The May 2011 Daring Bakers’ challenge was hosted by Emma of CookCraftGrow and Jenny of Purple House Dirt. They chose to challenge everyone to make a Chocolate Marquise. The inspiration for this recipe comes from a dessert they prepared at a restaurant in Seattle.

I was really happy when I saw this month's challenge since it is another gluten free recipe selected for the Daring Bakers. It is a fairly involved dessert, but it can be easily broken down in two days of preparation. The marquise and the caramel can be done the day before, but the meringue has to be made right before plating the dessert, and that is one of this dessert flaws in my opinion. As I experimented with the plating for the photo the meringue lost its body and I had to whip it again.


The presentation is really elegant, however the dessert was so sweet that I could only eat one spoonful. This concoction belongs to those desserts that make me want to drink a gallon of water afterwards, not sure why, years of sugar overload? I would have served it without the caramel and the meringue as they are also really sweet. I loved the crunchiness of the sesame brittle but that too was sweet.


The other drawback of this dessert is that it is really difficult to handle once you remove it from the freezer and toss it in cocoa powder, you have to move quickly.


My notes:
*I made the quarter recipe and I had plenty of marquise, again a little goes a long way with this dessert, so with a quarter recipe I got 8 portions.
*I piped the marquise into 6 oz cans I have been saving with both top and bottom removed. Each portion was probably coming up to 2/3 of the can. The frozen marquise came out easily while still frozen.
*I used ground star anise in the marquise, not chili, and I was pleased with the results, but next time I would only add 1 tsp of ground star anise to the chocolate base.

I wish you could smell these flowers, their fragrance is so sweet.

Thank you Emma and Jenny for challenging this month, and to Lisa of La Mia Cucina and Ivonne of Cream Puffs in Venice, the creators of the Daring Bakers' challenge. To see the recipe and more of the daring bakers' creations click here.

Wednesday, April 27, 2011

Daring Bakers-Pecan Tarlets with Maple Mousse


It is that time of the month again, the 27th, and I am ready! This month's challenge was to create edible receptacles for the maple mousse we were given to try. I especially liked the recipes of this challenge because there is no gluten involved. Evelyne provided us with the recipe to make nut cups for the mousse, and I also tried a mini tart recipe I have had in my "to try" folder, which is also gluten free.


The April 2011 Daring Bakers’ challenge was hosted by Evelyne of the blog Cheap Ethnic Eatz. Evelyne chose to challenge everyone to make a maple mousse in an edible container. Prizes are being awarded to the most creative edible container and filling, so vote on your favorite from April 27th to May 27th at http://thedaringkitchen.com!


Evelyne, a Quebec native, gave us few suggestions for the "containers", one included bacon. I have to say, despite liking savory desserts I am also very traditional, and bacon is not something I have tried in desserts, I can't quite go there (can I also confess without offending anyone that I am not really fond of bacon?). She also gave us a recipe for nut cups which were super easy to make and tasted great....did I mention gluten free?


I decided to use two flavor combinations, maple/pecan/banana, and maple/coconut/lemon/blueberry. For the first combination I used pecans for the nut cups, sautéed some bananas with sugar, a little butter, and rum, and then topped the mousse with chocolate pecan dragées. For the coconut combination I made a Meyer lemon curd and used blueberries to balance the sweetness and add color.


I wish I remember where I found the recipe for the coconut tartlets, I normally write the source next to the title, not this time. I apologize to the author for not giving the credit. Both mixtures for the cups came together in no time, the only drawback is that the edges are not perfect, but I like rustic anyway.


For the recipes and to see other wonderful creations check out the daring bakers site here.

Coconut tartlets
3 egg whites
3 cups unsweetened coconut
3/4 cup sugar

Mix all the ingredients together. Press 1 inch balls into mini muffin pans sprayed with no-stick spray. You can use your fingers wet with water, or a mortar pestle if it fits the cups. I only made a third of this recipe and I got about 16 mini tartlets on a mini muffin mold.

Meyer Lemon Curd
adapted from Passion for Dessert

3 whole eggs
3 yolks
3/4 cup sugar
1/2 cup Meyer lemon juice
Zest of two lemons
1.5 oz unsalted butter

Mix the eggs and the yolks with the sugar, add the juice and the zest, mix well. Cook on a double boiler until thickened. Add the butter, stir to melt, and refrigerate, covered. I only make a third of this recipe and it was enough for the 16 tartlets.

Chocolate Pecan Dragée

1/2 cup sugar
2 pounds pecans
2 tablespoons butter

Heat the nuts in a warm oven. Caramelize the sugar to a deep amber color, add the warm nuts, coat well, turn the flame off, and add the butter. Mix until all the butter is melted and the nuts are well coated. Spread on a silpat-lined pan and divide the nuts from one another, until they don't stick together any longer (wearing latex gloves helps with the heat). Cool completely and store in an air tight container. Warning, these are addictive!

Melt some 60% chocolate over a double boiler and pour just few tablespoons on the cooled pecans. With a spatula mix the nuts until well coated, and chill. Repeat this coating 8-10 times, mixing well after every chocolate addition to avoid the nuts to stick together. Once the nuts look uniformly coated dust with cocoa powder. The secret is only to add just a spoon full to two of chocolate every time to allow a very thin coat. By stirring the nuts while the chocolate cools you create a nice dull thin coat.


My notes:
* I sprayed the mini muffin pans with no stick spray and that worked well.
* To help press the nut and coconut mixture into the pan I used a marble pestle that was the right size, and kept dipping it in water to avoid sticking. If you don't have anything of the right side you could press them with your hand and wet finger tips.
* I baked the tartlets like the recipe suggested but ended up lowering the temperature quite a bit to allow the bottom to cook without burning the edges.
* Reading few posts of the other bakers in the DB forum I realized that the mousse was too sweet. I decided to cut down on the amount of maple syrup in the recipe to just a cup and withholding some of the gelatin. The amount of mousse was really large, and I had leftovers after filling the 16 mini tartlets.
* The nut bowl recipe made 16 or so mini tartlets.

This was a fun challenge and I loved to see all the amazing creations of other daring bakers. Thank you Evelyne for choosing this month's theme and thanks to Lis and Ivonne, the wonderful creators of this group that keeps us pushing deadlines and gives us the spark to try something new every month.

Sunday, March 27, 2011

Daring Bakers-Yeasted Meringue Coffee Cake

This post is dedicated to all the people of Japan, struggling to rebuilt after the terrible disaster caused by the tsunami. I have been amazed at their courage and grace in the face of such immense tragedy. I hope that nature will spare this country from another such disaster.

Saffron, garam masala, pistachio cake

This months I am prepared and finished a day early, unbelievable! Well...it helps that the 27th is on a Sunday, doesn't it?

Amazing considering the distraction caused by my two new babies, aren't they irresistible?

Baby chicks, two days old

The March 2011 Daring Baker’s Challenge was hosted by Ria of Ria’s Collection and Jamie of Life’s a Feast. Ria and Jamie challenged The Daring Bakers to bake a yeasted Meringue Coffee Cake.


I have to confess that I was a little hesitant about this challenge. I love making bread, and I love brioche type doughs, don't get me wrong, but the use of a meringue inside the cake? I didn't think it would be a good thing. Boy was I wrong, the meringue dissolves into the dough and the filling, creating a super moist interior that is just perfect.

Cinnamon apple cake

I made three versions of this cake, the two suggested by the hosts, and one with apples and cinnamon since I had some leftover cooked apples in the fridge. I only tasted the one with the apples, and the one with the saffron and the garam masala. I really preferred the one with the apples, I don't think that saffron and chocolate really work together. Next time I will omit the chocolate and only use nuts. Other very picky (cough) discerning tasters declared the chocolate cake perfect! I was really happy with this recipe, and it would be great to make a savory version like many other daring bakers did. To check out their creations check the daring bakers website.


If you want to download the recipe in a pdf file click here, and for the original posts by the two hosts click here and here.

Chocolate cinnamon cake

Here are my notes...
* I made a sponge with the yeast, the milk, the water, and a little of the sugar. I left the sponge develop for 30 minutes covered with the rest of the flour, the rest of the sugar and the salt.
* I then added the eggs, adjusted the dough by adding some milk, and mixed until I got a good gluten development.
* Four cups of flour are too much for the amount of liquid. Since I normally dump all the ingredients together, I ended up adding more milk to get a softer dough. Either add less flour or be careful, and when the dough start getting together add a little bit of milk.
* I didn't add the butter until I got a good gluten development. Fat inhibits gluten development so by adding it later the dough develops better.
* The amount of saffron is not enough to give the dough a yellow tint, I ended up adding at least twice the amount.
* Because of the high fat content, the dough gets really sticky and soft. After mixing the dough I left it rise in the refrigerator for few hours, or overnight in the case of the saffron dough. The dough that rested overnight was so much easier to handle, I was able to roll it thinner and resulted in a tighter roll and in a visually better cake as well.

The first one to emerge, still working on a name

The second chick, adorable with white spot on her wings

This is off topic, unless you consider that I used the eggs from my own chickens for this cake. Last year one of our chickens became broody, meaning she wanted to be a mommy and kept sitting on the eggs. Sadly, of the four chicks that hatched only one remains, we named her Zorra because she is completely black (onedisappeared when very young, one was a rooster, and one was killed by a dog). About a month ago, Zorra, a bantam black cochin who is just seven months old, became broody too. Broody chickens sit on eggs to no end, get pecked and don't eat well, so we got 6 fertile eggs for her and last Friday two furry babies emerged. I have seen this miracle twice, and three times we had baby chickens in the house but I can't stop looking at them, they are so adorable.

Sunday, February 27, 2011

Daring Bakers-Panna Cotta and Florentine Cookies


I made it! Yes, I was able to finish the challenge in time...except that the florentine cookies didn't work out at all. It might have to do with the fact that I added ground pistachios without compensating by reducing the oats. The resulting cookies tasted great but were not lace cookies at all, but rather little wafers. The resulting dessert was "saved" by a cacao nib (or is it cocoa nib?) and pumpkin seed brittle I made to "dress" up the pannacotta. Delicious! Sadly, the computer crashed right after downloading the pictures from the camera so I lost them all, the above picture was taken with no light whatsoever, so excuse me as it is really bad. I also realized how difficult it is to photograph things that reflect light, the brittle was close to impossible to photograph without life reflecting from it.

The February 2011 Daring Bakers’ challenge was hosted by Mallory from A Sofa in the Kitchen. She chose to challenge everyone to make Panna Cotta from a Giada De Laurentiis recipe and Nestle Florentine Cookies.

The possibilities for flavoring the pannacotta are really endless, but since I had wanted to try a cacao nib pannacotta recipe it was easy to decide on the flavor I wanted to use. I was intrigued by the idea on pairing the cacao flavor with coffee so I used the gelée recipe we were given to layer on top of the pannacotta. I was not sure that the florentine would be my choice of cookie for a pannacotta so I made a brittle too, and chose a recipe that I had wanted to try and thought that it would go well with the pannacotta smooth texture.

For the complete recipes and methods check out Mallory's post.

For the cocoa nib pannacotta I added 1/2 cup of chopped nibs to the hot cream and steeped them for an hour. I used skim milk, and added 1/2 cup of chevre and reduced the volume of milk. The tangy flavor of the cheese worked well with the nibs.

I have to say that although pannacotta is really easy and versatile and can be made into a light dessert I will pass it over a silky creme brulee any time (even if Michael Bauer reviewed my pannacotta as textbook perfect once, yeah!). I also think that pannacotta is better paired with a berry puree in the summer months. The gelée was really not an interesting item in my opinion, maybe it would work better if it had a really strong taste, or as part of a deconstructed dessert.

The brittle recipe comes from the book The Essence of Chocolate, written by John Scharffernberger and the late Robert Steinberg, the two men behind what was once one of my favorite chocolates, Scharffen Berger, now owned by Nestle' and no longer my favorite. This is one of those books I buy, read (it gives an amazing overview on chocolate and of their dream), and rarely use. Something to change...I will try other recipes soon.

Pumpkin Seed Nib Brittle
from the book The Essence of Chocolate

1/4 cup Cacao nibs
1/4 cup raw pumpkin seeds
1/2 cup granulated sugar
1/4 cup water
1/8 teaspoon cream of tartar

Grind the nibs to smaller pieces and sift them to remove the dust. Toast the pumpkin seeds on medium heat until they start to pop, 2 to 3 minutes. Cool and set aside.

Cook the sugar with the water and the cream of tartar until the syrup starts to color. When the caramel color is medium to deep amber, remove the pan from the heat and stir in the rest of the ingredients. Pour the mixture on a silpat-lined or oiled pan and let cool. Break it in pieces and store in an airtight container.

Many thanks to Mallory for choosing this month's challenge and to Lisa of La Mia Cucina and Ivonne of Cream Puffs in Venice, the creators of the Daring Bakers' challenge. To check other daring bakers' creations, please check the daring kitchen's site.

Friday, December 24, 2010

Daring Bakers-Christmas Stollen


I love Stollen! This delicious German sweet belongs to a family of European breads made with eggs, butter, and lots of dried fruit. Panettone and Gubana are other examples, and they probably all generated in the middle ages, when spices, nuts, and dried fruit were used to add nutrition to winter breads. I have made this bread few times when I was in Venice last year, using Whild Yeast Susan's recipe. They were very well received and went quickly. Stollen is normally eaten at Christmas and it represents the blanket the baby Jesus was wrapped in. We were challenged to shape the dough as a wreath, which works really well too.

The 2010 December Daring Bakers’ challenge was hosted by Penny of Sweet Sadie’s Baking. She chose to challenge Daring Bakers’ to make Stollen. She adapted a friend’s family recipe and combined it with information from friends, techniques from Peter Reinhart’s book.........and Martha Stewart’s demonstration.


Sadly I had to give up gluten, so I made this bread but didn't eat it, it was torture let me tell you. I brought it up to the West Point Inn, an amazing place up on Mount Tamalpais, reachable only by foot, where we spent last night. I knew that our friends and their children would love having it for dessert or even for breakfast. We ate it at night and as french toast this morning, delicious! And to make you want to visit San Francisco, here are two pictures of this morning's sunrise, from the Inn, totally priceless!


Amazing views of San Francisco at sunrise


Penny challenged to package the stollen for gift giving so I cooked few mini stollens in these super cute paper molds and gave them as gift to few of my neighbors.

You can find the complete recipe and instructions at the daring kitchen site, but below is just the recipe, edited to make the ingredient list easier to read.

I candied my own peel using the method I normally use, and used grapefruit and lemon peel since that is what I had at home.

I made few changes to the recipe, first in the mixing. I omitted 3 ounces of flour to the dough as the original 27 ounces seemed too much, I prefer a wetter dough in general, plus you can always add more flour if it is not enough. The amount I used, 24 ounces, worked well. Then I didn't add the butter until after the gluten started developing. Fat inhibits gluten development, by adding the butter slowly after the dough has been mixed a while you create a softer, more elastic dough. I used cranberries instead of the raisins to make the bread even more festive (the Germans don't use cranberries as they are a Northern American fruit), and didn't use the cherries the recipe suggests. Last change was in the spice, I used ground cardamom instead of the cinnamon, because it goes so well with the citrus flavor.

Stollen Wreath

Makes one large wreath or two traditional shaped Stollen loaves.
Serves 10-12 people

Ingredients

1/4 cup (60ml) lukewarm water (110º F / 43º C)
2 packages/4.5 teaspoons/14 gr/.5 oz active dry yeast
1 cup milk
5 oz/10 tablespoons/140 gr unsalted butter
5.5 cups/27 oz/770 gr all-purpose flour
½ cup/115 gr sugar
3/4 teaspoon/4.5 gr salt
1 teaspoon/6 gr cinnamon
3 large eggs, lightly beaten
Grated zest of 1 lemon and 1 orange
2 teaspoons/10 ml vanilla extract
1 teaspoon/5 ml lemon extract or orange extract
3/4 cup/4 3⁄4 oz/135 gr mixed peel
1 cup/6 oz/170 gr firmly packed raisins
3 tablespoons/45ml rum
12 red glacé cherries (roughly chopped) for the color and the taste. (optional) I didn't use them
1 cup/3.5 oz/100 gr flaked almonds
Melted unsalted butter for coating the wreath
Confectioners (powdered) sugar for dusting wreath

Directions

Soak the raisins
In a small bowl, soak the raisins in the rum (or in the orange juice from the zested orange) and set aside. See Note under raisins.

To make the dough

Pour 1⁄4 cup (60 ml) warm water into a small bowl, sprinkle with yeast and let stand 5 minutes. Stir to dissolve yeast completely.

In a small saucepan, combine 1 cup (240 ml) milk and 10 tablespoons (150 ml) butter over medium - low heat until butter is melted. Let stand until lukewarm, about 5 minutes.

Lightly beat eggs in a small bowl and add lemon and vanilla extracts.

In a large mixing bowl (4 qt) (4 liters) (or in the bowl of an electric mixer with paddle attachment), stir together the flour, sugar, salt, cinnamon, orange and lemon zests.

Then stir in (or mix on low speed with the paddle attachment) the yeast/water mixture, eggs and the lukewarm milk/butter mixture. This should take about 2 minutes. It should be a soft, but not sticky ball. When the dough comes together, cover the bowl with either plastic or a tea cloth and let rest for 10 minutes.

Add in the mixed peel, soaked fruit and almonds and mix with your hands or on low speed to incorporate. Here is where you can add the cherries if you would like. Be delicate with the cherries or all your dough will turn red!

Sprinkle flour on the counter, transfer the dough to the counter, and begin kneading (or mixing with the dough hook) to distribute the fruit evenly, adding additional flour if needed. The dough should be soft and satiny, tacky but not sticky. Knead for approximately 8 minutes (6 minutes by machine). The full six minutes of kneading is needed to distribute the dried fruit and other ingredients and to make the dough have a reasonable bread-dough consistency. You can tell when the dough is kneaded enough – a few raisins will start to fall off the dough onto the counter because at the beginning of the kneading process the dough is very sticky and the raisins will be held into the dough but when the dough is done it is tacky which isn't enough to bind the outside raisins onto the dough ball.

Lightly oil a large bowl and transfer the dough to the bowl, rolling around to coat it with the oil. Cover the bowl with plastic wrap.
Put it in the fridge overnight. The dough becomes very firm in the fridge (since the butter goes firm) but it does rise slowly… the raw dough can be kept in the refrigerator up to a week and then baked on the day you want.

Shaping the Dough and Baking the Wreath

1. Let the dough rest for 2 hours after taking out of the fridge in order to warm slightly.
2. Line a sheet pan with parchment paper.
3. Preheat oven to moderate 350°F/180°C/gas mark 4 with the oven rack on the middle shelf.
4. Punch dough down, roll into a rectangle about 16 x 24 inches (40 x 61 cms) and 1⁄4 inch (6 mm) thick.
Starting with a long side, roll up tightly, forming a long, thin cylinder.
Transfer the cylinder roll to the sheet pan. Join the ends together, trying to overlap the layers to make the seam stronger and pinch with your fingers to make it stick, forming a large circle. You can form it around a bowl to keep the shape.
Using kitchen scissors, make cuts along outside of circle, in 2-inch (5 cm) intervals, cutting 2/3 of the way through the dough.
Twist each segment outward, forming a wreath shape. Mist the dough with spray oil and cover loosely with plastic wrap.

Proof for approximately 2 hours at room temperature, or until about 11⁄2 times its original size.
Bake the stollen for 20 minutes, then rotate the pan 180 degrees for even baking and continue to bake for 20 to 30 minutes. The bread will bake to a dark mahogany color, should register 190°F/88°C in the center of the loaf, and should sound hollow when thumped on the bottom.

Transfer to a cooling rack and brush the top with melted butter while still hot.
Immediately tap a layer of powdered sugar over the top through a sieve or sifter.
Wait for 1 minute, then tap another layer over the first.
The bread should be coated generously with the powdered sugar.
Let cool at least an hour before serving. Coat the stollen in butter and icing sugar three times, since this many coatings helps keeps the stollen fresh - especially if you intend on sending it in the mail as Christmas presents!

When completely cool, store in a plastic bag. Or leave it out uncovered overnight to dry out slightly, German style.

Saturday, November 27, 2010

Daring Bakers-Apple and Lavender Crostata

I finished on time this month, yeah! Ironically, I made the same crostata for Thanksgiving but forgot to take a picture of it, and probably it was for the better as by the time it came out of the oven there was no day light to take a picture of it. I served it with caramel ice cream, and it was devoured. This tart went in the oven that it was almost dark so the pictures are really bad, plus it is really hard to take pictures of brown food, see the difference with the rose photo, taken at the same time.


The 2010 November Daring Bakers’ challenge was hosted by Simona of briciole. She chose to challenge Daring Bakers’ to make pasta frolla for a crostata. She used her own experience as a source, as well as information from Pellegrino Artusi’s Science in the Kitchen and the Art of Eating Well.

Not sure how to fix the following format, I tried everything, short of rewriting the post, not sure how it happened, apologies.....

When people ask me what my specialty is as a pastry chef I immediately say tarts and cookies, so I was happy to have the excuse to make a crostata for the DB challenge, I will never tire of them. A crostata is essentially a tart, in Italy we mostly make two types, the classic version with pastry cream and fresh fruit, and the one with jam and a lattice top. Because of my love for fresh fruit tarts (crostate), I started making them in college whenever I was going somewhere for dinner, soon I was making them all the time, just so I could eat them. Crostate sealed my fate I believe, as I started trying different versions and never stopped. I believe that what attract me of this dessert is the endless variations. The crust can be flavored by adding lemon zest, vanilla, or ground nuts, and it can be baked blind or with the filling, depending on the recipe. The sky is the limit when it comes to the filling, as you can see from the many versions of other daring bakers. You can find the complete recipe here.

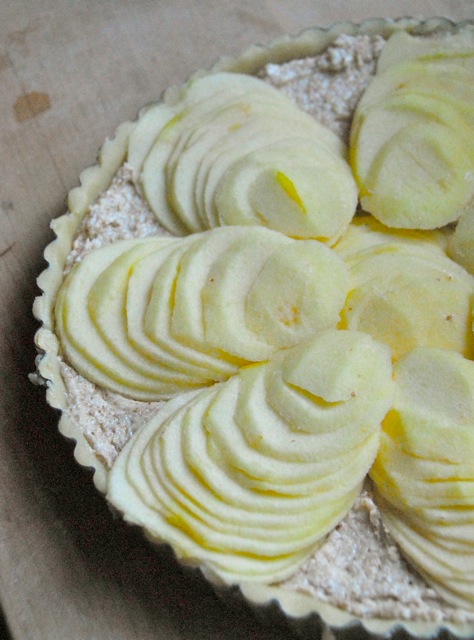
Simona, whom I first met in cyber space and then in real life, gave us two versions of pasta frolla to try, and complete freedom when it came to the filling. Pasta frolla is a type of paté sucree, and it is made by just making a mound of flour, adding the butter in pieces, and binding everything with an egg or few yolks, it comes together in minutes and it is delicious. I struggled for few days to decide what to make, since there are so many fantastic flavors I could have used. This particular tart became my favorite for a while, I first saw it in the 1992 book Savory to Sweet: Pies and Tarts, which is no longer published. I have made this tart dozen of times, it is not only stunning but also delicious. This tart comes from Normandie, a region in France where they grow apples and lavender, thus the pairing of the two in this tasty tart. The recipe for frangipane is mine, the one from the book is a little too rich for my taste. You can omit the lavender if you prefer (I used a tablespoon), but I urge you to try it, it goes really well with the apples.

This bad photo reminds me of pre-digital photos from the 60's, but can't do better than this

Pasta frolla

Ingredients:

  • 1/2 c. minus 1 tablespoon [105 ml, 100 g, 3 ½ oz] superfine sugar (see Note 1) or a scant 3/4 cup [180ml, 90g, 3 oz] of powdered sugar
  • 1 and 3/4 cup [420 ml, 235 g, 8 1/4 oz.] unbleached all-purpose flour
  • a pinch of salt
  • 1 stick [8 tablespoons / 4 oz. / 115 g] cold unsalted butter, cut into small pieces
  • grated zest of half a lemon (you could also use vanilla sugar as an option, see Note 2)
  • 1 large egg and 1 large egg yolk, lightly beaten in a small bowl

Note 1: Superfine sugar is often also referred to as ultrafine, baker’s sugar or caster sugar. It’s available in most supermarkets. If you cannot find “superfine” sugar, you can make your own by putting some regular granulated sugar in a food processor or blender and letting it run until the sugar is finely ground.

Note 2: There are different ways of making vanilla sugar. I keep vanilla beans in a jar half-filled with sugar until I need to use them, for example, to make vanilla ice cream. After I remove the split bean from the custard that will go into the ice cream maker, I rinse it, dry it and put it back in the jar with sugar.

Making pasta frolla by hand:

  1. Whisk together sugar, flour and salt in a bowl.
  2. Rub or cut the butter into the flour until the mixture has the consistency of coarse crumbs. You can do this in the bowl or on your work surface, using your fingertips or an implement of choice.
  3. Make a well in the center of the mounded flour and butter mixture and pour the beaten eggs into it (reserve about a teaspoon of the egg mixture for glazing purposes later on – place in the refrigerator, covered, until ready to use).
  4. Add the lemon zest to your flour/butter/egg mixture.
  5. Use a fork to incorporate the liquid into the solid ingredients, and then use your fingertips.
  6. Knead lightly just until the dough comes together into a ball.
  7. Shape the dough into a flat disk and wrap in plastic wrap. Place the dough in the refrigerator and chill for at least two hours. You can refrigerate the dough overnight.


Making pasta frolla with a food processor:

  1. Put sugar, flour, salt, and lemon zest in the food processor and pulse a few times to mix.
  2. Add butter and pulse a few times, until the mixture has the consistency of coarse meal.
  3. Empty food processor's bowl onto your work surface
  4. See step 3 above and continue as explained in the following steps (minus the lemon zest, which you have already added).

Variation for Version 1 of pasta frolla:

If you want, you can make the pasta frolla using a combination of all-purpose flour and whole-wheat pastry flour.

If you choose to try this variation, use 1 cup [240 ml, 135 g, 4 3/4 oz.] unbleached all-purpose flour and 3/4 cup [180 ml, 100 g, 3.5 oz.] whole-wheat pastry flour.


Frangipane


4 oz. butter, at room temperature
1/2 Cup sugar (100 gr)
1 egg
2 Cups ground almonds (hazelnuts would work as well)

In the bowl of an electric mixer, beat the butter and the sugar until fluffy, add the egg, and beat until well incorporated. Scrape the side of the bowl and add the ground almonds. Spread evenly in the unbaked tart shell. Frangipane keeps few days in the refrigerator and can be frozen for weeks.

Assembly:

Peel, halve, and core 4 apples (I used Golden delicious). Cut each half in very thin slices, keeping the pieces together. Sprinkle one tablespoon of lavender flowers on the unbaked shell, then spread the soft frangipane on top. Add the sliced apples fanning the slices as shown in the pictures. Bake at 350F until the frangipane is set and the apples start to color. Brush the top with diluted and strained apricot preserve to give the tart a beautiful shiny look (warm up few tablespoons of jam with a little water, bring to a boil and then strain any fruit pieces out).

Many thanks to Ivonne of Cream Puffs in Venice and Lisa of La Mia Cucina, founders of Daring Bakers, and to Simona for choosing this month's challenge.

Tuesday, November 9, 2010

Squash Doughnut-A Daring Bakers Challenge


I have been a member of the Daring Bakers since March 2009 and sadly I haven't been able to participate every month. October's deadline caught me by surprise while working part time for a caterer. I was working so hard I didn't even realized it was the 27th until I started seeing doughnut posts going up. I really wanted to try participating in the doughnut challenge, especially since there were so many variations to choose from. Doughtnuts have been having a ranaissance lately, recipes have popped up in many food blogs, and Lara Ferroni, a very talented food photographer, just came out with a doughnut book. Since I missed the deadline, I challenged myself to eventually try all the recipes we were given to choose from, and started with the pumpkin doughnuts, which are not leavened by yeast, but by baking powder and soda instead. The recipe is really straightforward and simple. I used roasted Cabocha squash instead of the canned pumpkin for convenience, since I had it at home, and for flavor as well. The taste and consistency reminded me of little doughnuts called Castagnole, normally prepared in Italy during the Carnival. Needless to say, they went fast!


The October 2010 Daring Bakers challenge was hosted by Lori of Butter Me Up. Lori chose to challenge DBers to make doughnuts. She used several sources for her recipes including Alton Brown, Nancy Silverton, Kate Neumann and Epicurious.

I added the post lines just for the sake of being correct, and presented the recipe as written by Lori. I hope you will try it as it is worth it.


Pumpkin Doughnuts

Preparation time:
Hands on prep time - 15 minutes
Chilling time - 3 hours
Cooking time - 10 minutes

Yield: About 24 doughnuts & 24 doughnut holes

Ingredients
All Purpose Flour 3.5 cup / 840 ml / 490 gm / 17 ¼ oz
Baking Powder 4 teaspoon / 20 ml / 24 gm / .85 oz
Table Salt 1 teaspoon / 5 ml / 6 gm / .2 oz
Cinnamon, ground 1 teaspoon / 5 ml / 6 gm / .2 oz
Ginger, ground ½ teaspoon / 2.5 ml / 3 gm / .1 oz
Baking Soda ½ teaspoon / 2.5 ml / 3 gm / .1 oz
Nutmeg, ground ¼ teaspoon / 1.25 ml / 1.5 gm / .05 oz
Cloves, ground 1/8 teaspoon / .6 ml / ¾ gm / .025 oz
White Granulated Sugar 1 cup / 240 ml / 225 gm / 8 oz
Butter, Unsalted 3 Tablespoon / 45 ml / 42 gm / 1.5 oz
Egg, Large 1
Egg Yolk, Large 2
Pure Vanilla Extract 1 teaspoon / 5 ml
Buttermilk 1/2 cup + 1 Tablespoon / 135 ml /
Pumpkin 1 cup / 240 ml / 285 gm / 10 oz (Canned pure pumpkin or fresh cooked and pureed pumpkin – DON’T use pumpkin pie mix!) I used squash instead
Canola Oil DEPENDS on size of vessel you are frying in – you want THREE (3) inches of oil (can substitute any flavorless oil used for frying)

Powdered Sugar Glaze:

Powdered (Icing) Sugar 2 cup / 480 ml / 250 gm / 9 oz
Whipping Cream (About 32% butter fat) 4 Tablespoon + more if needed / 60 ml

Directions:

  1. Whisk together the first 8 ingredients in medium bowl to blend. Using electric mixer, beat sugar and butter in large bowl until blended (the mixture will be grainy and not smooth). Beat in egg, then yolks and vanilla. Gradually beat in buttermilk; beat in pumpkin. Using rubber spatula, fold in dry ingredients in 4 additions, blending gently after each addition. Cover with plastic; chill 3 hours.
  2. Sprinkle 2 rimmed baking sheets lightly with flour. Press out 1/3 of dough on floured surface to 1/2- to 2/3-inch (12 mm to 15 mm) thickness. Using 2 1/2-inch (65 mm) -diameter round cutter, cut out dough rounds. Arrange on sheets. Repeat with remaining dough in 2 more batches. Gather dough scraps. Press out dough and cut out more dough rounds until all dough is used.
  3. Using 1-inch (25 mm) diameter round cutter, cut out center of each dough round to make doughnuts and doughnut holes.
  4. Line 2 baking sheets with several layers of paper towels. Pour oil into large deep skillet to depth of 1 1/2 inches (40 mm). Attach deep-fry thermometer and heat oil to 365°F to 370°F (185°C to 188°C). Fry doughnut holes in 2 batches until golden brown, turning occasionally, about 2 minutes. Using slotted spoon, transfer to paper towels to drain. Fry doughnuts, 3 or 4 at a time, until golden brown, adjusting heat to maintain temperature, about 1 minute per side. Using slotted spoon, transfer doughnuts to paper towels to drain. Cool completely.
Sugar Glaze
  1. Whisk powdered sugar and 4 tablespoons whipping cream to blend. Whisk in additional cream, 1 teaspoon at a time, to form medium thick glaze.
  2. Can be made up to 3 hours ahead.
  3. Add doughnut holes to bowl of spiced sugar and toss to coat.
  4. Spread doughnuts on 1 side with powdered sugar glaze.
  5. Arrange doughnuts, glazed side up, on racks. Let stand until glaze sets, at least 30 minutes.

Monday, September 27, 2010

Daring Bakers-Decorated Sugar Cookies


I can't believe I missed the past two Daring Bakers' challenges. Both challenges were super fun but I just didn't have it in me to participate, I would have done a semi good job.

The September 2010 Daring Bakers’ challenge was hosted by Mandy of “What the Fruitcake?!” Mandy challenged everyone to make Decorated Sugar Cookies based on recipes from Peggy Porschen and The Joy of Baking.

This new challenge was fun, fun, fun, so thank you Mandy! Mandy challenged us to make the cookies, which were straight forward and simple, and decorate them, which was challenging! She also gave up free range for the theme, which had to do with the month of September. First of all I love making cookies of all sorts, and to decorate them it is even better. It took me a while to decide what to use as the theme, as I quite never thought of September as a month that has a particular meaning (besides the marking of a new school year). I first thought of making flowers, then I thought of leaves as it is Autumn after all, but apparently in don't own either shape in my huge collection of cookie cutters, not sure how this happened. I then decided to try this composition I saw years ago in a cake store as a sample for their cookie decorating class. I thought it was so beautiful and clever, and for years I have wanted to make it but never got around to it. I thought it was great to start early on Halloween, one of my favorite times of the year. I don't think that this cookie will be eaten, we'll keep it for decoration.

The recipe is really easy, the cookies are not too sweet and like Mandy mentioned they really don't spread that much, keeping their shape pretty well. I baked them at 325 F as I do for all the cookies, this way they color more evenly and I never risk over baking them if I forget to check them often. I used vanilla as flavoring, but lemon zest would have been even better. The royal icing is also straight forward, Mandy's instructions are really detailed. Decorating took a lot of patience, as you have to wait for the icing to dry, in my case it was so hot that it took no time at all.

How can you resist this face?

Outlining...

Basic Sugar Cookies:
Makes Approximately 36x 10cm / 4" Cookies

200g / 7oz unsalted butter, at room temperature
400g / 14oz all purpose flour
200g / 7oz / caster sugar / superfine sugar
1 large egg, lightly beaten
5ml / 1 tsp vanilla extract / or seeds from 1 vanilla bean

Directions
• Cream together the butter, sugar and any flavorings you’re using. Beat until just becoming
creamy in texture.
• Beat in the egg until well combined, make sure to scrape down the sides of the bowl.
Add the sifted flour and mix on low until a non sticky dough forms.
• Knead into a ball and divide into 2 or 3 pieces.
• Roll out each portion between parchment paper to a thickness of about 5mm/1/5 inch (0.2 inch)
• Refrigerate for a minimum of 30 minutes.
• Once chilled, peel off parchment and place dough on a lightly floured surface.
• Cut out shapes with cookie cutters or a sharp knife.
• Arrange shapes on parchment lined baking sheets and refrigerate for another 30mins to an hour.
• Re-roll scraps and follow the above process until all scraps are used up.
• Preheat oven to 180°C / 350°F.
• Bake until golden around the edges, about 8-15 minutes depending on the size of the cookies.

Royal Icing:

315g – 375g / 11oz – 13oz / 2½ - 3 cups icing / confectioner’s / powdered sugar, unsifted
2 large egg whites
10ml / 2 tsp lemon juice
5ml / 1 tsp almond extract, optional

Directions

• Beat egg whites with lemon juice until combined.
• Sift the icing sugar to remove lumps and add it to the egg whites.
Tip: I’ve listed 2 amounts of icing sugar, the lesser amount is good for a flooding consistency, and the larger amount is for outlining, but you can add even more for a much thicker consistency good for writing. If you add too much icing sugar or would like to make a thinner consistency, add very small amounts of water, a few drops at a time, until you reach the consistency you need.
• Beat on low until combined and smooth.
• Use immediately or keep in an airtight container.

Thanks go to Cat for choosing this month's challenge and to Lisa of La Mia Cucina and Ivonne of Cream Puffs in Venice, the creators of the Daring Bakers' challenge. To check other daring bakers' creations, please check the daring kitchen's site. To see the complete recipe and more detailed information on how to decorate please check Mandy's post here.

Thursday, May 27, 2010

Daring Bakers-Piece Montée or Croquembouche


I am not sure how I managed to publish this on time. The restaurant I am working at just got the permit from the health department yesterday and we are working like crazy to open next week, my life revolves around this now. I will write more about this new adventure in another post, there is so much to say. Knowing that the 27th would be crazy I made the little paté a choux on Saturday instead, as dessert for a group of friends that came over for dinner. I filled them with a meyer lemon cream and accompanied by a sinful caramel sauce (I will have to write another post with the recipes). They were delicious but I would love to try all the other variations of the pastry cream you can see below, but this is for another time.


The May 2010 Daring Bakers’ challenge was hosted by Cat of Little Miss Cupcake. Cat challenged everyone to make a piece montée, or croquembouche, based on recipes from Peter Kump’s Baking School in Manhattan and Nick Malgieri.


Pate a Choux (Yield: About 28)

¾ cup (175 ml.) water
6 Tbsp. (85 g.) unsalted butter
¼ Tsp. salt
1 Tbsp. sugar
1 cup (125 g.) all-purpose flour
4 large eggs

For Egg Wash: 1 egg and pinch of salt.

Pre-heat oven to 425◦F/220◦C degrees. Line two baking sheets with parchment paper.

Preparing batter:
Combine water, butter, salt and sugar in a saucepan over medium heat. Bring to a boil and stir occasionally. At boil, remove from heat and sift in the flour, stirring to combine completely. Return to heat and cook, stirring constantly until the batter dries slightly and begins to pull away from the sides of the pan. Transfer to a bowl and stir with a wooden spoon 1 minute to cool slightly. Add 1 egg. The batter will appear loose and shiny. As you stir, the batter will become dry-looking like lightly buttered mashed potatoes. It is at this point that you will add in the next egg. Repeat until you have incorporated all the eggs.

Piping:
Transfer batter to a pastry bag fitted with a large open tip (I piped directly from the bag opening without a tip). Pipe choux about 1 inch-part in the baking sheets. Choux should be about 1 inch high about 1 inch wide.
Using a clean finger dipped in hot water, gently press down on any tips that have formed on the top of choux when piping. You want them to retain their ball shape, but be smoothly curved on top. Brush tops with egg wash (1 egg lightly beaten with pinch of salt).

Baking:
Bake the choux at 425◦F/220◦C degrees until well-puffed and turning lightly golden in color, about 10 minutes. Lower the temperature to 350◦F/180◦C degrees and continue baking until well-colored and dry, about 20 minutes more. Remove to a rack and cool.

Filling:
When you are ready to assemble your piece montée, using a plain pastry tip, pierce the bottom of each choux. Fill the choux with pastry cream using either the same tip or a star tip, and place on a paper-lined sheet. Choux can be refrigerated briefly at this point while you make your glaze.

Hard Caramel Glaze:
1 cup (225 g.) sugar
½ teaspoon lemon juice

Combine sugar and lemon juice in a saucepan with a metal kitchen spoon stirring until the sugar resembles wet sand. Place on medium heat; heat without stirring until sugar starts to melt around the sides of the pan and the center begins to smoke. Begin to stir sugar. Continue heating, stirring occasionally until the sugar is a clear, amber color. Remove from heat immediately; place bottom of pan in ice water to stop the cooking. Use immediately.

Assembly of your Piece Montée:
You may want to lay out your unfilled, unglazed choux in a practice design to get a feel for how to assemble the final dessert. For example, if making a conical shape, trace a circle (no bigger than 8 inches) on a piece of parchment to use as a pattern. Then take some of the larger choux and assemble them in the circle for the bottom layer. Practice seeing which pieces fit together best.

Once you are ready to assemble your piece montée, dip the top of each choux in your glaze (careful it may be still hot!), and start assembling on your cake board/plate/sheet. Continue dipping and adding choux in levels using the glaze to hold them together as you build up. (You may want to use toothpicks to hold them in place – see video #4 below).

When you have finished the design of your piece montée, you may drizzle with remaining glaze or use ribbons, sugar cookie cut-outs, almonds, flowers, etc. to decorate. Have fun and enjoy! Bon appétit!

Ingredients:

For the Vanilla Crème Patissiere (Half Batch)
1 cup (225 ml.) whole milk
2 Tbsp. cornstarch
6 Tbsp. (100 g.) sugar
1 large egg
2 large egg yolks
2 Tbsp. (30 g.) unsalted butter
1 Tsp. Vanilla

Dissolve cornstarch in ¼ cup of milk. Combine the remaining milk with the sugar in a saucepan; bring to boil; remove from heat. Beat the whole egg, then the yolks into the cornstarch mixture. Pour 1/3 of boiling milk into the egg mixture, whisking constantly so that the eggs do not begin to cook. Return the remaining milk to boil. Pour in the hot egg mixture in a stream, continuing whisking. Continue whisking (this is important – you do not want the eggs to solidify/cook) until the cream thickens and comes to a boil. Remove from heat and beat in the butter and vanilla.

For Chocolate Pastry Cream (Half Batch Recipe):
Bring ¼ cup (about 50 cl.) milk to a boil in a small pan; remove from heat and add in 3 ounces (about 80 g.) semisweet chocolate, finely chopped, and mix until smooth. Whisk into pastry cream when you add the butter and vanilla.
For Coffee Pastry Cream (Half Batch recipe)
Dissolve 1 ½ teaspoons instant espresso powder in 1 ½ teaspoons boiling water. Whisk into pastry cream with butter and vanilla.

Thanks go to Cat for choosing this month's challenge and to Lisa of La Mia Cucina and Ivonne of Cream Puffs in Venice, the creators of the Daring Bakers' challenge. To check other daring bakers' creations, please check the daring kitchen's site.

Saturday, March 27, 2010

Daring Bakers-Orange Tian


The 2010 March Daring Baker’s challenge was hosted by Jennifer of Chocolate Shavings. She chose Orange Tian as the challenge for this month, a dessert based on a recipe from Alain Ducasse’s Cooking School in Paris.

I never heard of this dessert before reading about the daring bakers' March challenge. I thought it was a perfect selection for this time of the year since citrus fruits are at their best (in the northern hemisphere that is). This was another fun challenge, and I gave it a little spin and based the presentation on a dessert I saw in Charlie Trotter's Desserts cookbook. If you don't know this book check it out because it is amazing, full of beautiful pictures and creations, truly inspirational. In the book each dessert has many different components that can be used alone or together to create beautiful masterpieces. Trotter's dessert was composed by almond cookies, fresh strawberries, whipped cream and a basil syrup.


For the cookies I decided to substitute a third in weight with almond flour to the sablee recipe. I believe it is actually a sucree recipe but I am not Ducasse! I then rolled the dough into a squared log, froze it, cut 1/4" thick slices, added a sliced almond on top, and baked the cookies at 325F. The cookies were great, not too sweet, and the crumb was really nice. It was hard not to eat them all.


I loved the marmalade recipe because the extra added juice helped cooking the fruit pieces and imparted a nice flavor. I didn't add any pectin to the marmalade, just cooked it to a thick consistency. The color was stunning!


For the syrup I used a purplish peppermint I grow in my garden, ground it with sugar using a mortar, added some water and cooked it to a light syrup.


For the final presentation I sandwiched the cookies with whipped cream (that I didn't stabilize), and blood orange marmalade. I then cut some segments of blood oranges, dressed them with a little mint syrup and arranged them around the cookie stack.


Delicious!


Thanks Jennifer for choosing this month's challenge and to Lisa of La Mia Cucina and Ivonne of Cream Puffs in Venice, the creators of the Daring Bakers' challenge. To see the recipe and more of the daring bakers' creations click here.

LinkWithin

Related Posts with Thumbnails