Saturday, May 30, 2009

Bread Baking Buddy-Italian Knot Bread


The talented Ilva of Lucullian Delights chose the recipe this month and I loved it!

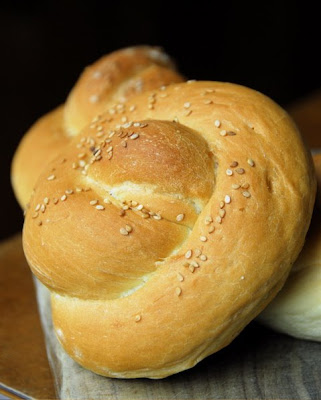
The recipe comes from the book Pane: Il Piacere di Preparare il Pane in Casa by Anna Gennari. Ilva chose to make pane di pasta tenera condita which she re-named Italian Knot Bread, which in Italian means flavored soft dough bread.

I adapted Ilva's notes and used Lien's ingredient list, since they were already written with instant yeast, which I used, and she halved the recipe.

Pane di Pasta Tenera Condita

Biga
200 g normal bread flour
5 g fresh yeast or 1/4 tsp dry instant yeast
170 ml water

- Dissolve the yeast in a little water and quickly work the dough together.
- Put it in a container, cover it with a half closed lid or kitchen towel and leave it for 15-24 hrs.

Dough
250 g biga
500 g flour (type 00)
200-260 ml water, lukewarm
15 g fresh yeast or 1 1/2 tsp dry instant yeast
25 g extra-virgin olive oil
30 g lard (or butter)
12 g honey
12 g salt
- Put the flour either in a big bowl or on a baking board, add the lard and mix it with your fingers until it has 'crumbled' and is completely mixed with the flour.
- Dissolve the yeast in little tepid water and add it to the flour. Mix as well as you can.
- Mix salt, olive oil and honey with the like-warm water and add it to the flour. Mix the dough until it holds together and then add the biga.
- Work the dough until it is smooth and doesn't stick either by hand or with a mixer.
- Put it into a bowl, cover it and leave to rise until it has doubled.
- After the dough has doubled, divide it into smaller parts, about 100 g/3,5 oz each.

To see how to shape each piece of dough please check Ilva's or Lien's websites.

1. Roll out each portion into 20" long stands and lay them out on a flat surface.
2. Make a semi-circle with the dough stand.
3. Twist the two end together.
4. Bring the two ends towards the upper part of the circle.
5. Lift/fold the top part over the twisted part.
6. Take the two end and join them together under the actual knot, this will make the knot part come out more and it hides the ends.

- Put the knots on baking sheets and let to rise until they have doubled in size.
- Bake in a pre-heated oven (200°C/390°F) for 30-35 minutes.

My notes:
I absolutely loved this bread! It reminds me of the little panini I used to eat in Italy, which are always present at each child's birthday party, stuffed with butter and prosciutto. I will make it again in smaller size and keep it in the freezer for quick snacks.

The biga fermented for 15 hours only.

I decided to be lazy, and used all purpose flour for the bread. I also used butter instead of lard (both for a yuck factor, and because I have no idea where to find it). The a/p flour gave it a tender crust, and I believe that the OO flour will make this bread even more tender.

The strands were difficult to roll more than 16 inches, but I was able to form the knots as well. The shaped bread didn't look smooth at first, but once properly proofed it looked beautiful.

Baking was straightforward, the bread colored nicely.

The taste was wonderful, the crust soft, and tasty from the honey, the butter and the oil.


The bread passed the butter and jam test so it is a keeper indeed.

Thanks to Ilva and the other BBBabes! To see some of their creations check out their sites: Bake My Day (Karen), I Like to Cook (Sara), Living on Bread and Water (Monique), My Kitchen in Half Cups (Tanna), Grain Doe (Gorel), Notitie van Lien (Lien), The Sour Dough (Mary aka Breadchick), Cookie Baker Lynn (Lynn), Living In The Kitchen With Puppies (Natashya)

Wednesday, May 27, 2009

Daring Bakers-Strudel Challenge

This month's challenge was one I was especially looking forward to making. Apple Strudel is an ultimate comfort dessert for me. It has the goodness of apples, the comfort of heat, and brings back loads of memories. It is common to find offerings of apple strudel in many pastry shops in northern Italy. The Austrian Hungarian Empire before WWI included the area now known as Sud Tirolo, in the Trentino-Alto Adige region of Italy. Like many other bordering areas, this part has influenced the surrounding territories in many ways, especially with food. Many people still speak Austrian German in the area, they have German last names, and some treat you differently if you are Italian. I used to spend wonderful skiing vacations in Val Badia, one of the most incredible skiing resorts in the Alps. I have fond memories of the food I ate while vacationing there, especially of the deer sausages eaten with caraway flatbreads, and the ever present Apfelstrudel. I remember like it was yesterday the anticipation for that warm slice of strudel after a full day of skiing, tired and hungry we would devour it in just few seconds. The best apple strudel I ever tasted was in Austria, while vacationing with my group of "old" friends, but sadly I don't remember were we were. My friend Paola makes a wonderful strudel but she gets teased mercifully because it looked like a crescent, therefore re-named el curasan, or croissant, in the Venetian dialect.


I had never tried making it until I bought an issue of Savor magazine where they showed in details how to stretch the dough and gave a recipe that proved really good and true to the original. I became a fanatic of strudel and made it over and over for months, always with apples. The strudel was always great but I didn't quite learn how to stretch the dough perfectly until I worked with DMG, who taught me how to pull the dough to its thinnest. I took to the task of making the strudel at the restaurant with lots of passion and loved doing it. His recipe had some bread flour and it worked like a charm every time.

The May Daring Bakers’ challenge was hosted by Linda of make life sweeter! and Courtney of Coco Cooks. They chose Apple Strudel from the recipe book Kaffeehaus: Exquisite Desserts from the Classic Cafés of Vienna, Budapest and Prague by Rick Rodgers.


For this challenge, I decided to make a traditional strudel with apples, but I used some port sour cherries I had in the fridge instead of the raisins. I made a lemon-thyme creme fraiche ice cream to go with it, and the combination worked well.


Because cherries are so plentiful now I also made a version with cherries to which I added pistachio streusel instead of the bread crumbs. I made a lemon verbena sabayon and the two worked well together.


Inspired by other bloggers, I finally decided to try something new as well, or should I say play with my food. I rolled to dough to setting #7 of my kitchen aid pasta attachment, then cut it with a round cookie cutter. I then sprinkled some powder sugar on each round before baking them at 400F for few minutes, until nice and browned. I then made a napoleon with the lemon verbena mascarpone sabayon, sprinkling some of the pistachio streusel I made last month on top.


You can find the complete recipe in Linda's blog.

Strudel dough
from “Kaffeehaus – Exquisite Desserts from the Classic Cafés of Vienna, Budapest and Prague” by Rick Rodgers

1 1/3 cups (200 g) unbleached flour
1/8 teaspoon salt
7 tablespoons (105 ml) water, plus more if needed
2 tablespoons (30 ml) vegetable oil, plus additional for coating the dough
1/2 teaspoon cider vinegar

1. Combine the flour and salt in a stand-mixer fitted with the paddle attachment. Mix the water, oil and vinegar in a measuring cup. Add the water/oil mixture to the flour with the mixer on low speed. You will get a soft dough. Make sure it is not too dry, add a little more water if necessary.
Take the dough out of the mixer. Change to the dough hook. Put the dough ball back in the mixer. Let the dough knead on medium until you get a soft dough ball with a somewhat rough surface.

2. Take the dough out of the mixer and continue kneading by hand on an unfloured work surface. Knead for about 2 minutes. Pick up the dough and throw it down hard onto your working surface occasionally.
Shape the dough into a ball and transfer it to a plate. Oil the top of the dough ball lightly. Cover the ball tightly with plastic wrap. Allow to stand for 30-90 minutes (longer is better).

3. It would be best if you have a work area that you can walk around on all sides like a 36 inch (90 cm) round table or a work surface of 23 x 38 inches (60 x 100 cm). Cover your working area with table cloth, dust it with flour and rub it into the fabric. Put your dough ball in the middle and roll it out as much as you can.
Pick the dough up by holding it by an edge. This way the weight of the dough and gravity can help stretching it as it hangs. Using the back of your hands to gently stretch and pull the dough. You can use your forearms to support it.

4. The dough will become too large to hold. Put it on your work surface. Leave the thicker edge of the dough to hang over the edge of the table. Place your hands underneath the dough and stretch and pull the dough thinner using the backs of your hands. Stretch and pull the dough until it's about 2 feet (60 cm) wide and 3 feet (90 cm) long, it will be tissue-thin by this time. Cut away the thick dough around the edges with scissors. The dough is now ready to be filled.

Thanks to Linda and Courtney for choosing this month's challenge and to see more creations check out the official site for the Daring Bakers.

Monday, May 25, 2009

Bread Baker's Apprentice #3-Bagels

This is the third week of the challenge started by Nicole at Pinch my salt. We are baking through Peter Reinhart's book The Bread Baker's Apprentice. We are going in alphabetical order because that is how the recipes are organized, and we are not publishing the recipes not to break any copyright laws. This book is a treasure of information, techniques, and stories on the different breads so if you are into bread or would like to start somewhere this is a great book to start The amazingly prolific Peter Reinhart is coming out with another book this fall and I am looking forward to buying it.

This recipe was so much fun to make! I was totally intimidated before trying it, as bagels were not in my list of things that I wanted to try in the near future but I am sooo glad I joined this challenge, I needed a little push, and boy, was it worth it. I don't know why I was so scared, bagels are not that complicated.

Peter Reinhart is the guru of bread, his books are so informative, and the recipes very well written, they just make themselves if you follow the directions AND read the opening chapters. This recipe was no different, straight forward, very detailed, and so tasty. What I love about the Bread Baker's Apprentice is the amount of information on each bread and the detailed instructions on how to make each recipe. Thank you Peter for another keeper recipe.


The recipe starts with a sponge left to rise for 2 hours. When the sponge is ready the rest of the ingredients are added, including malt, a critical ingredients in making bagels, which in the active or diastatic form improves the taste of bagel by enzymatically releasing "flavors trapped in the flour". Peter gives suggestions on what to use if you cannot find malt, so nothing is lost, maybe depth of flavor. According to BBA, uncooked powdered malt is the first choice, but since I already had malt syrup I didn't bother buying more ingredients or trying to find powdered malt. The jar doesn't say whether the malt syrup was cooked or not, but by the deep brown color I suspect it was.

PR highly recommends using high gluten flour for the best texture, but again, I was lazy and used the bread flour I already had. I will try them again with HGF I can buy in bulk at a local store.

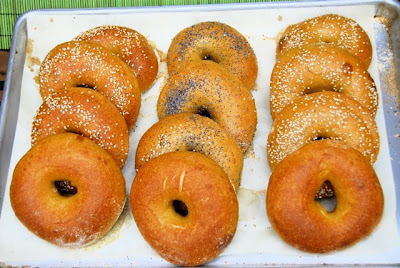
The dough is much stiffer than regular bread and took a while to pass the windowpane test and had to be hand kneaded for a while. The dough is portioned and rolled immediately. After 20 minutes the little balls are shaped either by making a hole in the center of by rolling into ropes and then sealing the ends. I shaped them by making a hole in the center and it worked out really well.

The next step was what took the most because my house was cold. The shaped pieces are left to rise 20 minutes and tested in water to see whether they float (which correlates to the yeast having been activated and making CO2). Mine took at least 45 minutes and I ended up putting the trays in the sun for few minutes because I had to leave the house!

The bagels are retarded in the fridge overnight, which works great to improve the flavor and you can have fresh bagels he next morning. The boiling and baking were straightforward except that the bagels took longer to bake than the book said.

The end product was really flavorful, beautiful to look at, and worth the effort. Next time I will try to boil them less as they were a little chewy, and boiling too long is probably the culprit according to BBA.

Sunday, May 24, 2009

The Bread Baker's Apprentice #2-Artos Bread


I am a day late for this but here is the second bread this group have tried. The recipe is part of a family of breads used in Greece to celebrate various festivities. Artos is the general name for Greek celebration breads, but there are many variations with different names, twists and turns. Nuts, dried fruit, and coins are also added depending on what event is celebrated. The book gives three variations of this bread, one being the bread Christopsomos, baked at Christmas time, which is a beautiful variation with a piece of dough added on top to resemble the cross. I wanted to try this but run out of time, so I only tried the simpler version of Artos bread, made with a starter, and with the addition of cinnamon, clove, nutmeg and all spice.

The bread is partially leavened with a barm or a poolish. I decided to use my sourdough starter since it works so well and has the same consistency of the barm from this book. As I normally do with any recipe, I first made the recipe as was written to try substitutions later. The bread was straightforward, and it performed how described in the recipe. I used the stretch and fold method to develop more gluten since I never get to the window pane test in my kitchenaid mixer. How I wish I had the money to buy a stronger mixer to make bread.....

After the first proofing, I divided the dough in two since it was way too big in my opinion. I shaped the two parts into a boule and let is rise a second time. Baking was at 350F without misting the oven, or scoring the top. The final bread looked great and I glazed it with a mixture of water, sugar and honey like Reinhart suggests, and topped it with sesame seeds.


I have to be honest, here...the execution of the bread was easy and I visually liked the final product, but the taste didn't do for me. There was a contrast between the sweet top and the less sweet crumb. I think that the addition of nuts and dried fruit will improve the taste quite a bit, so I will try it again, adding lots of dry fruit next time. I also didn't care too much for all the spices, maybe I will skip the clove, which tasted predominant, and add more of the other spices, or even some anice seeds to go with dry cherries.

Bagels are next, can't wait!

Tuesday, May 19, 2009

Bulghur Salad with Favas, Leeks, and Avocado


Initially the idea was to do a fava bean cover crop, let the plant grow during the winter and cut them before they bloomed to enrich the soil of Nitrogen. The plants had other ideas and they grew under our nose and started growing their beautiful pods. We didn't have the heart to stop them so we decided to let them grow more so we could harvest some of the fava beans before planting the next crop.


To know more about fava beans click here.

I collected 5 1/2 pounds of pods today, and after shelling them I had 1 3/4 pounds of beans. I made this simple salad, made with bulghur wheat, leeks, and fava beans. The beans were super tender and so fresh you could have eaten them raw.


Bulghur Salad with Fava Beans and Avocado


1 cup bulghur wheat
1 cup shelled, blanched and peeled fava beans
1 small leek
extra virgin olive oil EVOO
fresh mint
salt to taste
1 avocado, cut in cubes

Cook the bulghur wheat in 2 cups boiling water until tender. Drain and cool. Blanch the beans in boiling water for 1 minute, drain and chill in ice water to stop the cooking, peel the outer skin and reserve. Heat some EVOO in a skillet, add the leeks and cook until translucent, 5-10 minutes. Toss the wheat with some EVOO, fava beans, leeks, avocado, salt and chopped mint. Serve at room temperature, or chilled.

Buon Appetito!

Thursday, May 14, 2009

Ricotta Gnocchi-Gnocchi di Ricotta


As I don't have enough to do already, I tried to make this recipe for the daring cook challenge. For the very first Daring Cooks' challenge, Lis of La Mia Cucina and Ivonne of Cream Puffs in Venice, chose a recipe from The Zuni Café Cookbook by Judy Rodgers to make Ricotta Gnocchi. I have heard many things regarding these gnocchi, mostly raving about their amazing texture, so I was really looking forward to trying this recipe. I have learned few things today though. First, don't wait until the last possible day as things can go wrong, even to veteran cooks, second, have a plan B.

Since I had some home made ricotta in the fridge, made using the super simple recipe I got here, I forged ahead thinking it would be a piece of cake. The ricotta had already been drained for a while so I didn't think twice about using it. After I added the rest of the ingredients, including nutmeg and lemon zest, I realized in horror that the mixture looked way too wet. Not having time to make more ricotta nor to shop, I decided to try and add some flour to the dough. I tested the resulting, thicker dough, but the gnocchi fell apart! More flour was added, and the end result was....aheam.... pretty bad. I decided to post this anyway as a warning to others, the ricotta needs to be super dry for these gnocchi to work, not just drained, squeezed to death dry.


I will try again because the flavor and the consistency of the first gnocchi, the ones that fell apart, were pretty amazing.

Click here for the recipe, and here to see a video on how to shape the gnocchi.

Buon Appetito!

Tuesday, May 12, 2009

Bread Baker's Apprentice #1-Anadama Bread


I recently got bitten by the bread baking bug, or BBB, and I can't stop. For it I actually have to thank for the zillionth time my mentor, pastry chef extraordinaire, DMG. Chef D. has worked for Nancy Silverton, of all people, and I have learned tons from him. Before working with DMG my attempts at bread were really pitiful, and I almost gave up, thinking that breads made at home will never come close to what professional bakers are able to create. Since working alongside chef D. I acquired not only knowledge, but three great bread baking books and have tried successfully many recipes at home.

My last crazy idea was to join the newly formed BBA group, started by Nicole, the creator of Pinch my salt (love the name BTW). We will bake our way through the book The Bread Baker's Apprentice, one recipe per week. It is a totally insane commitment, but I love Peter Reinhart, I love The Bread Baker's Apprentice, and without this challenge I wouldn't possibly bake all the recipes in it.

The first bread we baked was the Anadama bread. In Peter's words this bread takes its name from the words that a hungry husband muttered when he realized that his wife had not only left him but departed leaving behind only a pot of cornmeal mush and some molasses. He muttered the words "Anna, damn 'her", mixed the mush and the molasses with some flour and yeast and this great bread was born.


I didn't know what to expect, but loved this recipe. It behaved exactly how described, it was easy to make, the dough was super soft and pleasant to work with, and the bread was really tasty. The molasses gives the bread not only a beautiful color and flavor, but it makes for an incredible soft crumb. It is not a bread for butter and jam, but rather for butter and prosciutto, or mayo and tomatoes. Really tasty!

Now onto the next challenge.....

Sunday, May 10, 2009

Chocolate Ice Cream and Cocoa Nib Tuiles


Judging by the mess above, this recipe wins the prize for messiest. However, it also wins a prize for being so chocolaty delicious.

I have had this recipe for a while but never tried it before. H, a very sweet person, recently asked me to make chocolate ice cream and I couldn't resist. The recipe comes from Chez Panisse, and I got it when I was a pastry intern in the summer of 2006. Chez Panisse is one of those restaurants that believe in sharing, customers can request a copy of any recipe and they will kindly oblige. Armed with this knowledge I am publishing this recipe without asking their permission.

I scaled down the recipe by a third, since I had the exact amount of yolks from a butter cream I made the previous weekend. If I had read the recipe more closely though, I would have noticed that, even after scaling, it still makes 4 quarts of ice cream base. OUCH! Once I started though, I decided to keep going so I would have chocolate ice cream for ever. Nothing wrong with that!


One of the reasons for the extreme mess and copious amount of pots, bowls and utensils used, was the breaking of the ganache. I followed their method of melting the chocolate with the cream, but maybe I mixed it too early and broke the ganache. I was about to pass out from hyperventilating when I saw those 10.5 precious ounces of Scharffen-Berger chocolate reduced to a horrible separated mess. My pastry senses came back and I was able to bring the ganache back together in a mixer by emulsifying it by adding some cold cream. PHEW!

Mess aside, this is an amazing ice cream, not too sweet and intensely chocolaty. Worth the effort.


Chocolate Ice Cream
adapted by Chez Panisse

1 3/4 cup cocoa powder
2 1/2 cup cream
2 1/2 cup milk
pinch of salt
2 cups sugar

10.5 oz. bitter chocolate
1 c cream

14 yolks
2 3/4 cup cream
2 3/4 cup milk

Put cocoa in a pan, add the cream to make a paste. Add the milk, the sugar, and salt and bring to a boil (mix the bottom constantly to prevent scorching). In the meantime, heat the cream to a boil and then pour onto chopped chocolate, wait 5 minutes and then slowly whisk them together, and set aside. When the cocoa mixture is hot, slowly pour it onto the yolks to temper them. If the mixture is very hot the yolks will custard, otherwise transfer the liquid onto a clean pan and heat it up stirring continuously, until the custard is thick enough to coat the back of the spoon (when your finger leaves a clear line through the custard on the spoon it's ready). Slowly stir the warm custard into the melted chocolate and whisk well. Slowly add the last amounts of cream and milk to the custard. Strain well and chill. Freeze according to your ice cream maker.


Cocoa Nib Cups
Courtesy of Pastry Chef DMG

3 oz sugar
1 oz glucose
3 oz butter
1 oz milk
6 oz cocoa nibs
1 oz flour

Partially grind the cocoa nibs, just enough to have some dust and slightly smaller nibs. Melt the butter, sugar and glucose in a heavy saucepan. Add the milk and whisk well. Add the flour and the nibs. Refrigerate until firm. Spoon onto a silpat, leaving space a lot of space since they expand quite a bit. Bake at 325F until firm. Let cool slightly until they can lifted without braking. Make cups or tuiles using the back of a muffin pan or rolling pin. If not using glucose, substitute corn syrup and decrease the milk by a teaspoon. Makes 12-16 cups depending on the size.

Wednesday, May 6, 2009

Bresaola-Italian Cured Beef


Bresaola is a wonderful dry cured meat from Valtellina, an area north-east of Milan, in the Lombardia region of northern Italy. The meat comes from beef, it is salted, spiced, and cured for 2-3 months. Bresaola is made from eye of round, and is lean and tender with a sweet, musty smell.


Bresaola is normally eaten raw, like prosciutto, thinly sliced, and simply served.

It is not easy to find this delicacy around town, but yesterday I was lucky enough to walk in DeLessio market on 302 Broderick Street in San Francisco, and when I spotted it in their display case I had to buy some. I have to go back there when I have more time, De Lessio shares the space with Falletti which has an incredible meat and fish display I didn't have time to savor entirely because of a time crunch.

I had Bresaola for lunch today, prepared like we normally do, dressed with some olive oil and vinegar, topped with some arugula salad, and shavings of Parmigiano Reggiano. So simple and oh so good.

Buon Appetito!

LinkWithin

Related Posts with Thumbnails