Thursday, January 28, 2010

Daring Bakers-Nanaimo Bars


The January 2010 Daring Bakers’ Challenge was hosted by Lauren of Celiac Teen. She chose Gluten Free (or not) Graham Crackers and Nanaimo Bars!

I started making the bars the same day the challenge was supposed to be revealed, another one of those time management mistakes I am known for, I blame it to my creative brain. Knowing that I had the whole day, I figured I could finish on time. But...I didn't count for the fact that I am not in possession of a camera (that's why I haven't posted much lately), and I hit a block when I realized that I didn't have the custard powder needed in the middle layer (note to self: read the recipe instructions before starting the process). I just assumed we were going to make everything from scratch, boy was I wrong. I knew this was going to be a problem since I have a revulsion for using anything that comes assembled in a box. Call me old fashioned, or stubborn, but I couldn't use a pudding mix so I first considered making my own custard, but since I wouldn't know what the consistency was, I quickly dropped that idea. Looking at other creations, especially Simona's, I thought of giving the bar a spin, after all, that's the whole point of the challenge, isn't it? Turning the bar into an ice cream sandwich was cool, I have the cookies, I have the chocolate, all I needed was vanilla ice cream and a camera...easy, right?

Lauren challenged us to make a gluten free bar, which I applaud her for. Unfortunately I wasn't able to find a sweet rice flour where I live, only white rice flour and since I didn't know whether it would work I decided to use regular all purpose flour for the graham crackers. The recipe comes from Nancy Silverton's recipe from Sweets from La Brea Bakery, found at 101cookbooks. I suspect this is the same recipe we used at a restaurant I worked at 2 years ago since DMG, the pastry chef I was working with, worked at Nancy's restaurant for a while. When I started mixing the dough everything felt really familiar. I cooked the cookies like we did at the restaurant, in a big layer and I cut them when almost set since they have the tendency of losing their shape, and turn into UFOs. I also figured that I needed the crumbs for the bottom layer so shape wasn't important.

Before I realized the problem with the middle layer I had already assembled the bottom layer, so I just froze it, added the vanilla ice cream on top, froze the two layers, cut them in squares, and then dipped them in melted chocolate. They were really yummy, not really bar like, and I am considering making them at the restaurant where I will start working at in April.


For the recipe and to see photos of some of the creations click here.

Thanks to Lauren for this challenge, and to Lisa of La Mia Cucina and Ivonne of Cream Puffs in Venice, the creators of the Daring Bakers' challenge.

Wednesday, January 6, 2010

Home Made Tortellini

Pictures suck big time, we were using a camera we didn't know, no natural light, with bad light bulb colors, I apologize.

Tortellini are something every Italian eat, usually cooked in meat broth. This tiny pasta comes from the region of Emilia Romagna, in particular from Bologna, the prominent city of the area. Tortellini, or turtlen in the local dialect, were probably born from the need to use up left over meat and the name comes from the shape of a little tortello, or something resembling a cake. There is another pasta called Cappelletti, or little hats, that are very similar to tortellini in shape and filling, but come from a different region in Emilia Romagna, and according to some internet sources are made with pasta that is rolled thicker.

Very close to where I grew up in Venice there used to be a tiny store that made homemade pasta. It was run by two sisters and had few automated pasta machines right in the front of the windows. Entering the shop you would be hit by the smell of fresh egg pasta that permeated the air. The two sisters sold fresh pasta in many shapes and forms, and my mom used to buy sheets or ribbons of pasta there, always wrapped in paper. I remember being mesmerized by the machine that would spit out perfectly shaped tortellini at an amazing speed, I always stopped by the store to see whether the tortellini machine was going. Like many artisanal stores it closed years ago, strangled by the cheapest versions made by big pasta manufacturers. All their costumers were heartbroken when they left, and tortellini have come from a sealed plastic bag ever since. In Italy there are few companies that make great fresh tortellini, but sadly this is not the case in the States where you can only find inedible versions of this pasta (this is my opinion only, feel free to accuse me of being a tortellini snob).

My very talented brother in law Stefano always makes tortellini in brodo around Christmas and his meat broth is legendary. Since we spent Christmas together this year, I challenged him to make our own tortellini using a recipe I found in Sarah's blog Fragole e Limone. I have to confess that I had to push a little because despite the fact that Italians love home made pasta, they rarely make it, tortellini are something people simply buy.

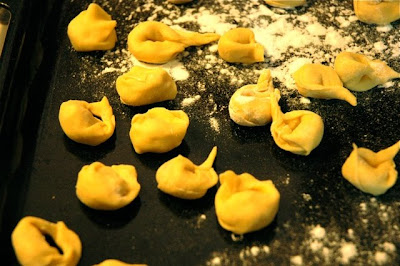
Sarah's recipe makes about 300 tortellini, and since we didn't have much time I had to enlist few people to make them and after the first few minutes we found a great rhythm, a kind of assembly line. As you can imagine we are not pro at making fresh stuffed pasta so most of our tortellini were really misshapen, and we had to find a different technique than Sarah's because we had a lot of rectangles instead of squares. In the end, the ugly ones tasted the same.


This recipe is really delicious, and I realize that most people would probably never make it or make it seldomly, but once you try it I challenge you to enjoy the store bought dry version again.

Tortellini are best cooked in broth as the flavors will leak out in water so if you bother making them at home do yourself the favor of making your own broth, a good home make chicken broth is all you need (grab an organic chicken, remove the legs to cook as you wish, cover with cold water, add a big onion cut in 4th, a medium carrot, celery, and a bunch of parsley, cook for 1-2 hours, chill, remove the meat and the fat, taste for seasoning).


TORTELLINI IN BRODO DELLA MIA NONNA
adapted from Sarah of Fragole e Limone

Ingredients for about 300 tortellini

For the pasta
500 gr all purpose flour
5 large eggs
2 tablespoon of EVO oil
salt a pinch

Mix all the ingredients, either by hand or with a mixer. Add more flour is too wet, or a little water if too dry. Once the pasta is smooth, let rest for an hour. Roll the pasta into ribbons using a pasta machine, at a very thin setting.

For the filling
1 small pork loin
1 small veal steak
100 gr prosciutto
1 egg
noce moscata a piacere
3-4 tablespoons parmesan cheese
2 tablespoons of butter
5-6 sage leaves
1/2 glass of white wine

Melt the butter with the sage leaves, add the meat and sear well. When the meat is cooked, remove it from the pan, add the wine and let cook down to a thick sauce (the filling has to be really dry to prevent the pasta from getting wet and stick. Once the meat is cool, process it to a paste with the nutmeg, salt, pepper, and the parmesan cheese. Add the egg and mix well.

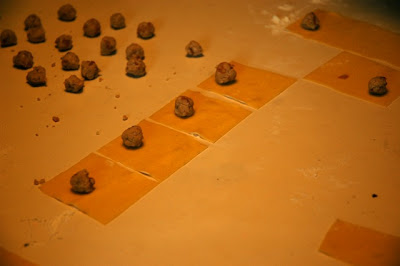
Add 1/2 teaspoons of filling to each pasta square, fold in half, seal, and shape (check Sarah's post for pictures). Let the pasta dry for an hour, the cook for 10-15 minutes, depending on the size and the thickness of the pasta.


TORTELLINI IN BRODO DELLA MIA NONNA
Ricetta di Sarah a Fragole e Limone

Ingredienti per circa 300 tortellini

per la sfoglia (vi dico quante uova ho usato io)
500 gr di farina 00
5 uova
2 cucchiai di olio
pizzico di sale

1° ripieno (versione nonna e Sarah)
1 lombatina di maiale
1 bistecca di vitello
100 gr prosciutto crudo
1 uovo
noce moscata a piacere
3-4 cucchiai di parmigiano
burro q.b
5-6 foglie di salvia

Si mette una noce di burro in padella con la salvia e si rosolano bene vitello e maiale: la carne deve cuocere fino ad avere quella crosticina dorata in superficie, che è ciò che da un sapore più deciso e gustoso al ripieno.
Poi lasciar raffreddare, tagliare a pezzi grossolani e frullare nel mixer (io lascio anche la salvia, ci sta benissimo) con il prosciutto, la noce moscata, sale, pepe e parmigiano.
Quando il trito è omogeneo aggiungerci l'uovo.
A quel punto stendere la sfoglia, farcire e chiudere i tortellini.
Noi li lasciamo asciugare qualche ora poi li congeliamo in sacchetti biporzione: la cottura in brodo poi è di circa 10-15 minuti, ma è soggetta sia alle dimensioni del tortellino sia allo spessore con cui avete tirato la sfoglia.

Buon Appetito!

LinkWithin

Related Posts with Thumbnails