Monday, July 27, 2009

Daring Bakers-July Challenge


Who says that the Milano cookies have to be oval?

The July Daring Bakers' challenge was hosted by Nicole at Sweet Tooth. She chose Chocolate Covered Marshmallow Cookies and Milan Cookies from pastry chef Gale Gand of the Food Network.

Nicole is a huge fan of Gale Gand. For July's challenge she wanted us to try Gand’s version on her favorite store bought cookies, Pepperidge Farm Milano Cookies and the Mallows. To find the complete recipe and see the work of many other talented bloggers please visit The Daring Kitchen site.

As usual, I found myself making this at the last minute so I will probably only post the Milano Cookies pictures today, but there is a chance I might be able to try the other cookies tomorrow (the cookie dough is done at least).

The Milano Cookie recipe was pretty straight forward, the egg whites have to be added slowly to prevent the emulsion of fat and white from separating.

I made two versions of these cookies, one with orange and cardamom, and one with coffee and hazelnut. I cut down the recipe in half and made half with the orange zest, and half with cocoa power. I am glad I didn't double the recipes because I got tons of cookies any way. For the orange cookies, I added only 1 teaspoon of vanilla and 1 teaspoon of orange extract, because I thought the original recipe had way too much (half recipe would have required a TBS of both). For the chocolate cookies I substituted a tablespoon of the flour with two tablespoons of cocoa powder, and sprinkled some hazelnut after the cookies started spreading in the oven. The chocolate cookies didn't turn out as crispy as the others, they actually were rounder and softer. The taste was very nice though.

For the filling I infused some of the cream with cardamom to which I added the orange zest, and some with ground espresso powder. The filling was tricky to make as I halved the recipe and the 1/4 cup of cream was not enough to melt the chocolate so I had to melt it in a double boiler.


The resulting cookies are really dangerous, so I might have to get rid of some of them, they are too tempting.

Thanks Nicole for choosing this recipe, I had fun with it and now I have another great recipe in my repertoire.

Sunday, July 19, 2009

Strawberry-Rhubarb Jam with Lime Zest


This jam was born out of necessity to cook some left over rhubarb. I often buy too much fruit and turn the very ripe leftovers into quick jams. These "leftover" jams don't have big yields, so they are consumed quickly and there is no need to preserve them in jars. I normally add very little sugar to start, and add more after the fruit has started to break down. Add more sugar if you prefer a sweeter jam or if you make such a quantity that you need to preserve it. Knowing that the rhubarb had only few days left in the fridge, I bought some strawberries to add to it. When I was trying to decide what to add as a flavoring (I normally add vanilla beans but wanted something different), I remembered that I had some left over limes as well. I quickly zested and juiced one lime and added them to the jam, ready for a surprise. The lime flavor is really subtle, but it is there, and it is more evident after the jam has been cooled and the flavor had a chance to develop. Really tasty indeed.


Strawberry-Rhubarb Jam with Lime Zest

1 pint strawberries, cut in quarters
1 pint rhubarb, cut in small cubes
sugar to taste (maybe 1/2 cup to start)
Zest and juice of one lime (add more zest if your prefer)

Mix all the ingredients in a small sauce pan. Bring to a simmer and cook until thickened. Cool completely and store in the refrigerator for few weeks.

Bread Baker's Apprentice #7 and #8-Ciabatta and Sticky Buns!


I am not sure which week of the challenge this is, but since I didn't have time to post on the Ciabatta, I will write about both breads in one post.

For those who are new to this blog, I am baking through Peter Reinhart's book The Bread Baker's Apprentice as part of a challenge started by Nicole at Pinch my salt. We are going in alphabetical order because that is how the recipes are organized, and we are not publishing the recipes not to break any copyright laws. This book is a treasure of information, techniques, and stories on the different breads so if you are into bread or would like to start somewhere this is a great book to start. The amazingly prolific Peter Reinhart is coming out with another book this fall and I am looking forward to buying it.

It was with a mixture of excitement and trepidation that I started making the seventh bread of Peter Reinhart's book The Bread Baker Apprentice. Without this challenge I would have waited longer to finally face my fears and make Ciabatta at home. See, I love Ciabatta! I grew up eating it, it is the best bread for juicy panini, and it tastes great. I am not sure why I hadn't tried it at home yet, maybe in the back of my head I thought that my home made version would only be a pale cousin to the real thing.

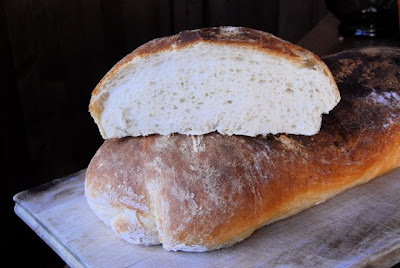
Ciabatta is a relatively "new" bread, probably a result of an accident in which the baker added too much water or run out of flour. The bread has a wonderful flavor, a nice crust and huge open holes. Because of the high hydration the bread is impossible to shape, but you rather coach it into a rectangle, so it results in a bread looking like a slipper, hence the name Ciabatta, which means slipper in Italian.

The book gives two versions, one starting with a biga and the other starting with a poolish. I made the bread using my starter since it was just fed and by adding some water it works as a poolish. Obviously I can not know whether my starter changed the end results, and I promised myself to try this bread again using a biga or a poolish in the near future.

The dough was super wet, easy to shape by using the fold method and the baked bread looked beautiful. The bread had a hard crust that softened after a the bread cooled (PR mentioned this in the book). The flavor was good, but the crumb was totally disappointing, it was super soft like the crumb of brioche, not the crumb for a panino. I will try it again, but this and the experience of the other participants in the challenge confirmed that ciabatta's holes are really hard to obtain at home. To see a great photographic tutorial, check Nicole's post.


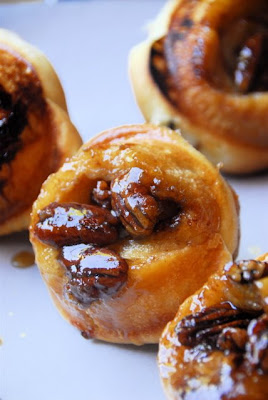
The sticky buns were another story. I made sticky buns many times before, using many different brioche recipes so I was curious to try PR's. The dough is made by first creaming the butter with the sugar, and then all the other ingredients are added. The dough comes together easily and the instructions are very clear. After rolling the dough I cut it in 1.5" pieces and let them retard overnight in the refrigerator.


The next day the buns proofed really fast, and they looked beautiful! For a great photographic tutorial visit Paul's post here.


The taste wasn't disappointing, although I think I liked the buns I used to make with Rose Levi Beranbaum's recipe better. Maybe I will make those for a future post.

Friday, July 17, 2009

A Day in the Life of Chicks

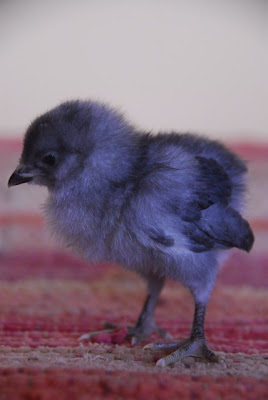
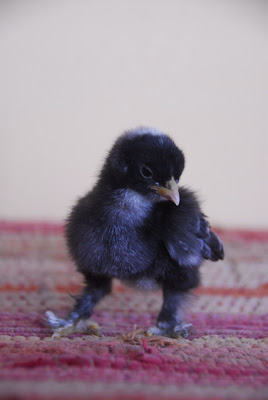
Meet the first two chicks of our new flock. Five chicks were supposed to arrive by mail this week, but because of incubator failure we did not receive them. We still kept the order, and they should be here on the week of the 27th. In the meantime, we heard of a local kid who was selling week-old chicks so we got two, and they are unbelievably cute. Who knew that I could get so attached to little birdies.


Cloudy
possibly a frizzle bantam cochin

Still nameless, maybe
Mama Chick (for her protective streak),
Funster, or Fuzzy Feet
possibly a Barred Cochin Bantam

A day in the life of week-old chicks goes like this:

wake-up early
peep
eat
poop
drink
scratch
peep
poop
practice flying
stretch-angel pose
fall over
poop
drink
peep
peck
eat your mate's poop directly from the butt
peep
fluff feathers
poop
peep
take a nap
repeat in random order
have an early bedtime

Tuesday, July 7, 2009

Tomato Corn Salad


I live on tomatoes in the Summer, and wish I could grow them year round. These beauties, a Cherry Gold variety, are the best cherry tomatoes in my opinion. They are very sweet, not acidic at all, and they grow beautifully and plentifully. Two years ago the first plant I grew took over and started growing on everything, including an oak plant nearby, very prolific indeed. It was also the last plant standing after it got too cold for the other tomato plants to survive the Fall, very hardy.


This salad is very simple, you can put it together in 15 minutes and is very refreshing. It would work as a pasta sauce, slightly sauteed with some garlic. You can use any cherry tomatoes, but I love the contrast of the orange, the yellow, and the purple of the basil leaves.

Tomato Corn Salad

1 pint cherry tomatoes, sliced
1 ear of corn
EVOO
Balsamic vinegar
Salt
Basil, chopped

Cut the kernels off the cobb, and boil for two minutes. Cool the corn in ice water, then toss with the rest of the ingredients.

Albino Creature


Claude, the albino alligator

It is real, and very creepy. I can't believe it leads a happy life, but it looks really healthy. I had to post this pictures, not related to food at all, but just as fascinating. The Academy of Sciences in San Francisco is an amazing place indeed.

Monday, July 6, 2009

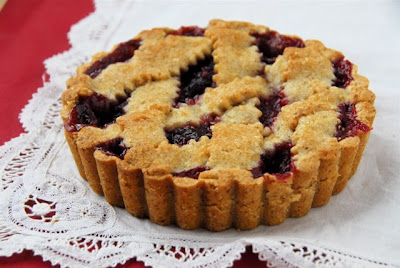
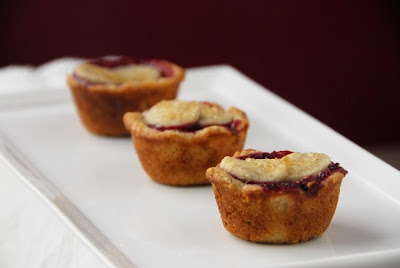
Fig Raspberry Crostata


I mentioned this crostata before, it is amazing, beautiful, and tasty. The filling has figs and raspberries, an unlikely combination that works perfectly. I have many memories related with figs, which grow almost wild in Italy. My first and not too fond memory of figs was of the smell of rotting fruit fallen from a huge, ancient looking tree. This tree grew in the back of a fort, left over after WWI, located in a tiny island in the Venetian lagoon, called Isola di Crevan. We used to sail to the island to join our friends whose relatives owned this tiny paradise, and spent amazing weekends, hiding, jumping off the dock, eating cherries from the trees.

Like I mentioned before, there is a short time where you can find the first figs a tree produces in the spring, to be followed in the fall by a second more bountiful crop. I was able to find organic figs that were not too expensive so I had the perfect excuse to make this.


The recipe comes from Baking with Julia, and the contributing baker is Leslie Mackie. If you don't know this book, it is a trove of recipes, most very rustic and delicious. Maybe I should start a Baking with Julia challenge. Like...I have the time.


The crust has almonds in it and is delicious. I changed the recipe a little because the original recipe had too much butter and the crust was impossible to work with. The following recipe is plenty buttery but less sticky. The dough is still very soft and in fact can be pressed directly into the tart mold, but to cut the lattice strips I advise you to roll the dough and freeze it before cutting it. The other thing I did was to skip the sesame seeds in the crust, somehow I thought they were an over kill. The filling is almost the same with slightly less sugar.


The tart tasted even better with the lemon verbena ice cream I made the other day.


Almond Tart Dough
9" lattice tart

2 eggs
1 teaspoon vanilla extract
1 1/4 cup unbleached almonds
1/2 cup sugar
2 cups all-purpose flour
1/4 tsp salt
Zest of one lemon
6 oz cold butter, cut in 1/2" cubes

Whisk the eggs together with the vanilla extract. Process the almonds with a tablespoon of sugar until they are finely chopped. Add the remaining sugar, flour, salt, and zest and mix just to combine. Add the butter and mix until the mixture resembles fine crumbs. Add the egg mixture and mix only until the dough is uniformly moistened, 15 seconds. Fully blend the ingredients by hand mixing gently a couple of times. Divide the dough in two unequal pieces (the smaller will be used for the lattice top). Press the bigger piece into the tart mold and freeze. After the rest of the dough has chilled for an hour, roll it in between two pieces of parchment paper until 1/8" thick. Freeze until ready to use.

Fig Raspberry Filling

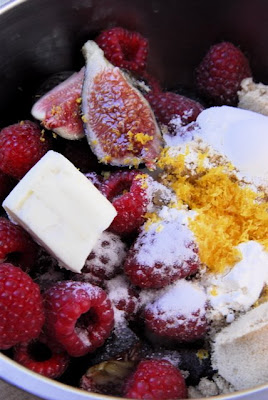
12 oz. Figs, quartered
12 oz. Raspberries
1/3 cup granulated sugar
1/4 cup brown sugar
1 1/2 tablespoon flour
1/2 teaspoon lemon zest
1 tablespoon butter

Put half of the fruit in a heavy bottom sauce pan and cook with the rest of the ingredients until bubbly. Turn the heat off and add the rest of the fruit. Chill completely before adding it to the tart.

To assemble the tart:
Add the filling to the frozen tart. Cut the frozen rolled dough in 1/2" strips, and use them to make the lattice top. Sprinkle with crystal sugar and bake at 350F until bubbly, rotating once.

Saturday, July 4, 2009

Vera da Pozzo-Campo Santa Margherita

Photo courtesy of Oscar of Blu Oscar

I just stumbled into an amazing blog, Blu Oscar, while searching information for some friends who are going to Venice soon. Oscar is an amazing photographer, has an incredible collection of images of Venice, clearly adores this city, and has been doing a fantastic job photographing it. The picture above is of a well I spend time jumping off as a little kid, close to where I almost cut off the head of a pigeon while learning how to bike without training wheels, or next to where I played hopscotch million times. The memories....

The photos are not any typical photos of Venice, instead they offer the view of an insider, of someone who sees Venice with very special eyes.

Thank you Oscar, what a wonderful tribute to my beloved city!

LinkWithin

Related Posts with Thumbnails