Monday, December 17, 2012

For the Children and the Staff of Sandy Hook

With unbelievable grief and sadness, I pay tribute to the children and the teachers lost in this horrible tragedy.   My heart breaks for their families and friends.

Charlotte Bacon 6
Daniel Barden
Olivia Engel 6
Josephine Gay 7 
Ana M. Marquez-Greene 6
Dylan Hockley 6
Madeleine F. Hsu 6
Catherine V. Hubbard 6
Chase Kowalski 7
Jesse Lewis 6
James Mattioli 6
Grace McDonnell 7
Emilie Parker 6
Jack Pinto 6
Noah Pozner 6
Caroline Previdi 6
Jessica Rekos 6
Avielle Richman 6
Benjamin Wheeler 6
Allison N. Wyatt 6
Rachel Davino
Dawn Hochsprung 
Anne Marie Murphy
Lauren Rousseau
Mary Sherlach
Victoria Soto

Saturday, October 27, 2012

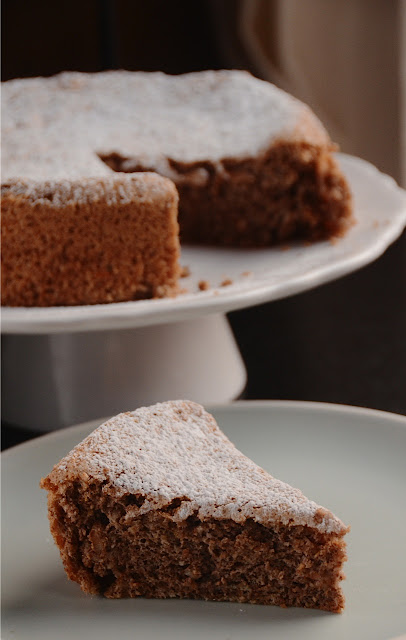
Walnut Sponge Cake-Flourless and Delicious


I made this wonderful cake at work as a base for the gorgonzola gelato I wrote about here, it is one of those cakes I can't stop eating and it gets better the next day, so it deserves a post of its own.  The recipe comes from Pure Desserts, written by one of the Bay Area most accomplished cookbook authors, Alice Medrich, and you can see the original picture of the cake on her website.  Her recipes are amazing, and she uses some of my favorite ingredients like cocoa nibs, buckwheat flour, saffron, cardamom, you name it.  

Now that I know I am gluten intolerant and work in a restaurant I always try to have one or two desserts on the menu that are gluten free.  This cake was first suggested to me years ago by a coworker as we were talking about the Pure Dessert book and some of our favorites recipes.  I liked it then, but when I made it recently I realized how truly outstanding this recipe is.  This cake surprised me for its simplicity and amazing taste, and it is so light and the lemon flavor intensifies the next day, you can serve it simply sprinkled with some powder sugar or with some whipped cream.  Alice Medrich suggests to make it with pecans as well.

Walnut Sponge Cake
from Alice Medrich

2 1/2 cups (10 ounces) walnut pieces
5 large eggs, separated
Zest of one lemon
1 tbs vanilla extract
1/3 cup plus 1/4 cup sugar
1/8 tsp salt

Preheat the oven to 325F.  Line an 8" springform pan with parchment paper.
Coarsely chop 1/2 cup of the nuts.  In a food processor process the remaining nuts until fine.  Combine the nuts and set aside.
Whip the yolks with 1/3 cup of sugar until pale yellow, add the lemon zest, vanilla, and salt.
Whip the whites until foamy, then gradually add the 1/4 cup of sugar until soft peaks form.
Add half of the whites to the yolks, then cover with half the nuts.
Gently fold the ingredients until incorporated, then fold in the rest of the nuts and egg whites.
Pour the batter into the prepared pan, and cook in the pre-heated oven until a toothpick comes out clean, 50-55 minutes.
Cool 5 to 10 minutes then remove from the cake pan.

Enjoy!


Saturday, October 20, 2012

Gorgonzola Gelato


I have been aching to write a post for weeks but I don't always have a recipe that is worth presenting here.   I actually wrote a post on a dessert I created but I lost the whole thing in one wrong click, so frustrating.   I love to have a semi-decent photo to go with the recipe and not always I have the time to set up the whole thing nowadays.   Yesterday I brought home the components of the dessert, quickly set up the plate, and took few photos before the ice cream melted in the late season heat the Bay Area is experiencing.

Savory desserts are my passion, a little trickier than the classic, but once I get a good combination, it is hard not to lick my fingers.  This ice cream recipe was passed to me by the executive chef I worked for, and I was very skeptical while making it.  See, I don't care for gorgonzola, I think my system revolts to the mold so I can't eat it at alll.  When he asked me to make this I thought it was going to be a very weird ice cream but when I took my first taste I was hooked!  Savory ice cream indeed, delicious!

I was shown the recipe on an i-pad and I quickly wrote it down on my to do list so I am not sure where the chef found it, but a quick search revealed an identical recipe here.  We decided to use slightly less sugar than the original recipe after we made it the first time.

I paired the ice cream with a flourless walnut cake that deserves its own post, it is delicious.

Gorgonzola Gelato

135 gr Gorgonzola dolce
60 gr heavy whipping cream
550 gr whole milk
225 gr granulated sugar
3 g salt

Remove the cheese rind, and cut it in small pieces.  Bring the cream, milk, sugar and salt to a simmer.  Pour the heated milk onto the cheese and mix until melted.  To ensure that the ice cream stays nice and white do not use an immersion blender or the "mold" part will turn the ice cream an off white color.  Chill completely and freeze according to your ice cream maker instructions.


Friday, August 31, 2012

Postcard from the Garden

I wish I had a recipe for you.  I only have time for a photo from my garden, which is buzzing with bees.

Recently I wrote about my intention of changing career, which is still in the making.  However, a pastry chef job landed on my lap and it was too good to pass.  I am working four days a week, having fun working at a restaurant, working with a super funny and talented chef who was born in a town an hour north of Venice.  We speak the same language, both literally and figuratively, and he makes a killer trippa, or tripe!

Spanish lavender and a very happy honey bee

I am slowly changing the dessert menu, the dessert of the week is roasted peaches, with port zabaglione, lemon verbena ice cream, and pistachio streusel.   Can't wait to go in tomorrow to find out how it sold the first night.

A better post with recipe soon....


Tuesday, July 17, 2012

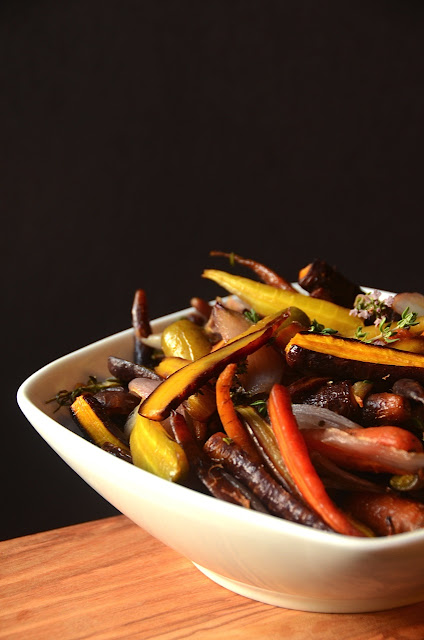
Roasted Rainbow Carrots with Shallots and Thyme


This is by far one of the easiest and most delicious dishes I have made  in a long time.  Roasting concentrates the flavor of many vegetables, and it is a quick and easy way to cook them.


I wish I had taken a photo of the carrots before preparing them, they were so beautiful, the colors so intense and appetizing.  I found them at the Point Reyes Farmers' market, which is held on Saturdays during the spring and summer months, such a special spot.  I also saw this beautiful chard but didn't buy it. 


This recipe will work with any carrots.   I have used butternut squash before, in which case you can use sage instead. The amounts are just and indication, if you like more thyme feel free to add more.

Roasted Rainbow Carrots with Shallots and Thyme

Two bunches of rainbow carrots
4 medium shallots
2 tablespoons extra virgin olive oil
1 tablespoon of fresh thyme
salt to taste
 
Pre-heat the oven to 400F.  Peel the shallots, leaving the root side intact, and cut them in thin sections.  Peel and cut the carrot in half lengthwise.   Toss the vegetables with the oil, thyme, and salt.  Cook on a baking pan lined with parchment paper until soft, 15-20 minutes, stirring few times.

Friday, July 6, 2012

Blueberry Tart-Without the Crumb


Remember the blueberry tart from few days ago?  Well since I had dough for another tart shell I used it to make a version of this wonderful apricot tart from Elra's baking, one of my favorite food bloggers.  I figured that most summer fruit will work in this tart, but since I had an over abundance of blueberries you get another blueberry tart.  Cherries would work as well, so would plums.


The crust can be any sweet tart dough of your choice, Elra's recipe, or the recipe I used, which is adapted from Sherry Yard.  The filling is a modified version of Elra's, I used lemon zest to flavor it and I used GF flour in mine.


Delicious!

Blueberry Crumb Pie

For the Crust:
2 cups a/p flour, or GF mix of your choice
1 cup yellow cornmeal
1/3 cup sugar
1 tsp salt
8 oz cold butter, cut in 1" pieces and chilled
Zest of two lemons
4 egg yolks
1/4 cup heavy cream

Pie Crust:
Mix the yolks and the cream together, set aside.  Mix the first four ingredients, either in a food processor bowl or a mixer bowl.  Add the chilled butter pieces and the lemon zest, pulse or mix with a paddle attachment until the mixture contains only small pieces of butter.  Add the yolks and cream mixture and pulse or mix just until incorporated.  Roll half of the dough into a disk and wrap in plastic wrap, refrigerate for an hour.  This recipe makes two pie crusts.

Filling:
4 TBS (50 g) unsalted butter, softened
1/4 cup (30 g) sugar
Zest of one lemon
1 large egg, at room temperature
1/4 cup (50 g) all-purposed flour or G/F flour
1/8 tsp baking powder
1 cup blueberries or fruit of your choice

Cream butter and sugar together, add the zest, mix.  Add the egg and mix until smooth.  Add the flour and baking powder and mix well.  Spread onto the chilled crust shell, distribute the blueberries on top and bake at 375F  for 25 minutes, or until golden.

NOTE:  For tarter fruit like plums I would increase the amount of sugar to maybe a 1/3 cup since the filling is not sweet at all, which is how I like it.

Wednesday, June 20, 2012

Blueberry Crumb Pie for Pie Day


I thought I had all week, then I realized Pie Day 2012 is today!  GASP!   I had the ingredients and the fruit so I was able to pull it off, however this will be published late, oh well.

I saw some pretty amazing pies in the internet, click here to go to the Facebook page of the event, the most stunning I saw was made by Irvin of Eat the Love.  I made mine with blueberries since I had some organic ones waiting to be used, and then I got the idea of the crumb topping from Irvin.  Et voila', a pie is made.

I wanted to try a new pie dough recipe, so I consulted one of my favorite books, The Secrets of Baking by Sherry Yard, and found this delicious sounding pie crust recipe.  I made it gluten free using Jeanne's mix.

Delicious!


Blueberry Crumb Pie

For the Crust:
2 cups a/p flour, or GF mix of your choice
1 cup yellow cornmeal
1/3 cup sugar
1 tsp salt
8 oz cold butter, cut in 1" pieces and chilled
Zest of two lemons
4 egg yolks
1/4 cup heavy cream

Pie Crust:
Mix the yolks and the cream together, set aside.  Mix the first four ingredients, either in a food processor bowl or a mixer bowl.  Add the chilled butter pieces and the lemon zest, pulse or mix with a paddle attachment until the mixture contains only small pieces of butter.  Add the yolks and cream mixture and pulse or mix just until incorporated.  Roll half of the dough into a disk and wrap in plastic wrap, refrigerate for an hour.  This recipe makes two pie crusts.

Filling:
4 cups blueberries
1/3 cup sugar
1 TBS corn starch
juice of one lemon

Crumb Topping
100 gr all purpose flour, or GF mix of your choice
80 gr cold butter, cut in 1/2" cubes
80 gr sugar
1/2 cup  almond meal
1/2 tsp cinnamon
Salt, a pinch
2 TBS heavy cream

In the bowl of a food processor, mix the dry ingredients together.  Add the butter and pulse until it is in small pieces.  Add the cream and pulse until the mixture turns crumbly. 

To assemble the pie:
Pre-heat the oven to 375F.  Roll half of the pie dough into a circle, line a pie dish, add the filling, then cover with the crumb topping. Bake until the crust is nicely browned and the fruit starts bubbling, about 50 minutes.  Cool slightly and serve with your favorite ice cream.

Tuesday, May 29, 2012

Breathing Deeply

Lady beetle resting on parsley flowers

Every time I start a new job I get really excited at the prospect of learning new things, doing what I love, being creative.  Unfortunately I had many mediocre jobs, only one stood out to be the best, I was working with a tremendous mentor, he taught me so much, it lasted more than a year.  After that, my job history has been spotty, working here and there, I was laid off twice.  I had grand hopes for my last job, I thought there was great potential, lots of room for growth, but it all came to a screeching halt once again.  I wasn't learning enough, which for me is the most important thing in a job, I was never given the money I wanted, and waking up at 4 was physically exhausting, so once again I quit.

Legion poppy, so delicate but stunning

Unfortunately I had to come to the conclusion that this career I have been trying for more than 8 years, that of a pastry chef, has to come to an end, it is no longer feasible for me, my life style, my family.  I don't seem to find my ideal place, so obviously I am doing something wrong, or maybe there isn't an ideal place.  It is really sad to realize that I will never able to have my own bakery, where I could make the desserts and pastries I love, tasty, rustic, unique, which are not found anywhere where I live.  I am not sure why but most pastries and desserts I see around my town are mediocre, either because there is no demand (i.e. people don't buy enough), or because people don't have the sophistication and keep buying bad examples of pastries.  Even restaurants have the same boring, uninspired selections, once I was asked to put a carrot cake on the dessert menu, really?  Needless to say, nobody bought it.


Enough complaining....my last day at work was Tuesday, so I have been home for a week, still processing and catching up.  I want to keep the blog going, something I seriously neglected for lack of time, and because I had so many things left undone I hadn't had time to update it.  In the past four months I also haven't had the chance to cook or bake anything worth blogging about, but I know I will get inspired soon, my favorite fruit to bake with, the stone fruits are coming to season in few weeks.


I also need to concentrate on my next move, which won't include pastries, but plants, as I am planning on becoming a garden consultant.  I just got a certificate as a Master Gardener, which is not much in terms of education, but I have learned so much, and more importantly I realized that I want to keep learning about horticulture, and make garden design and maintenance my new career.   I want to specialize in edibles, native plants, habitat gardens, and low water use gardens.  I also plan on finding work in existing landscaped gardens to help maintain them, not just as a gardener but as an expert.   I have two friends who want to hire me, so wish me luck!

The above pictures were taken in my garden, a source of relaxation, a place to learn through experimentation, and a great font of edibles.  Peas are the next crop, followed by tomatoes.  I need to plant some basil soon.


Wednesday, May 2, 2012

Black and White Wednesday #30


No much to add to this photo, I love the curls of the cinnamon sticks, I find geometry in food fascinating, and black and white photos work to enhance it.  I am submitting this photo to the fun event Black and White Wednesday, created by Susan, the master mind behind The well seasoned cook.  Brii of Briggishome is hosting this week's event.

I am having a day off and looking forward to catching up with my favorite blogs, and get some gardening done, yeah!


Sunday, April 29, 2012

Organic Gardening and Few Recipes


Aquilegia formosa propagated from seeds from Big Sur

This post is related to food in a way, but I am also in the process of creating a gardening site so I will keep the two creative aspects of my life separated.

Salvia involucrata aka Rose bud salvia propagated by cuttings

I am almost done with my Master Gardener certification, and I am busy applying all I have learned and more.  When we bought the house I live in, the garden was partially landscaped with drought resistant plants, and since then I have been adding a vegetable garden, and more plants in spots where some plants didn't flourish.   Initially I used aesthetic to select plants, and I had lots of failure, now I know why, either the conditions were not right for the plants or the soil wasn't amended well.

Bumble bee, and excellent pollinator

I have been using organic principles, composting, avoiding the use of pesticides, etc, but it wasn't until I heard all the wonderful lectures of the past 18 weeks that I deeply understood the practices of growing organically, and the importance of feeding the soil and maintaining beneficial insects. 

Soldier beetle in action

Insecticides will kill an unwanted pest but also a wide variety of beneficial insects.  Sometimes waiting a little will allow beneficial insects to find the pest, arrive in droves, multiply, and completely rid the plant of aphids. I haven't sprayed insecticides once in my garden, and recently added lots of plants that are beneficial to insects, plants that both feed the predator insects or attract pollinators.  Yesterday I was so excited to see an army of soldier beetles attacking the many aphids on my red russian kale, I also saw a beautiful lacewing and that is a sign that the beneficial insects are hard at work eating away unwanted aphids.   Some insects have a complete metamorphosis, like butterflies, the larva looks nothing like the adult form, so know your beneficial insects and their larval forms so you don't run the risk of killing them.

Bees love this thorny plant, not sure of its name

I am also turning my garden into a mini farm, we already have chickens, and inch by inch I am expanding the vegetable garden in the most sunny spot of the property.  I have added herbs, grow annual vegetables, and also planted some uncommon edible plants like hops, and nettles.  Borage is a wonderful and tasty edible, normally used to attract bees.  It can reseed itself, to the point of becoming invasive, but all I have to do is keep only the seedlings that took in good locations and eat the rest.  A win-win situation.

Stinging nettle, for food and infusions

I love stinging nettles in frittatas, risotto, and stuffed in ravioli, but I also infuse it in boiling water for 5 minutes, steep it for an hours, strain it and drink the water chilled.

Now for few recipes using ingredients grown in a garden...

Borage frittata
Rose geranium lemonade
Pizza with kale and ricotta salata
Kale frittata
Frittata with beet greens


Friday, April 6, 2012

Super Easy Fruit Crumb Bars


I can't believe I haven't posted in a month.  I can't even start describing how busy I have been, I don't even have time to check my favorite blogs, so frustrating!  Work is ridiculously busy since my co-worker hurt her wrists so I am working almost every day to do the morning baking.  I can't seem to catch up with sleep and when I get home there are millions things to do, blogging is the last thing in my mind, sadly.  I am in survival mode when it comes to cooking, so nothing fancy or remotely interesting has been made recently.  I catered a huge party two weeks ago and that was such a big undertaking but it went so well.  I made these bars for the party and they were a huge success, tasty, simple, and super fruity.  They were so good I had to make them gluten free so I could eat them too.  The recipe comes from Smitten Kitchen, who in turn adapted it from allrecipes.com.

The second time I made them I changed the recipe a little, adding almond meal, but the regular recipe it tasty as well.  I used Jeanne's gluten free mix, and I couldn't tell the difference, I tested this mix in few recipes and it is so wonderful.  Be warned though, these bars are addictive!

Ingredients

  • 1 cup white sugar
  • 1 teaspoon baking powder
  • 2 cups all-purpose flour of Jeanne's GF mix
  • 1 cup almond meal
  • 1 cup cold unsalted butter
  • 1 egg
  • 1/4 teaspoon salt
  • 4 cups fresh or frozen blueberries or cherries
  • 1/2 cup white sugar
  • 3 teaspoons cornstarch

Directions

  1. Preheat the oven to 375 degrees F (190 degrees C). Grease and line a 9x13 inch pan.
  2. In a medium bowl, stir together the sugar, the flour, the almond meal, salt, and baking powder.  Use a fork or pastry cutter to blend in the butter and egg, or use an electric mixer. Dough will be crumbly. Pat half of dough into the prepared pan.
  3. In another bowl, stir together the sugar and cornstarch. Gently mix in the blueberries. Sprinkle the blueberry mixture evenly over the crust. Crumble remaining dough over the berry layer.
  4. Bake in preheated oven for 45 minutes, or until top is slightly brown. Cool completely before cutting into squares. 

These bars come together so easily and I used frozen blueberries and small tart cherries.  They store well in the fridge and it is better to cut them in the desired size once chilled.

And now a photo of my new love, my sweet puppy,  isn't  she sweet and adorable?  We couldn't have asked for a better dog. 

Basking in the sun

Tuesday, March 6, 2012

My New Puppy


Now I am even busier...I have a brand new puppy in the house, chewing shoes, paper, towels, just being a typical puppy.  I never thought I could be a dog person,  never had a dog in my life, but those eyes and those soft hears totally won my heart.  She was one of 5 pups, whose names were chosen because the person who rescued them fed them cream of wheat.  We chose to keep her name, as it seems to work.  She is adjusting to our house and family pretty fast, and I can't wait for all the fun we'll be having.

Kashi, my new sweet girl

Friday, February 24, 2012

Salted Caramel Pecan Brownies

Brownies three ways: plain, with caramel, and fully loaded.

Few things have changed since my last post, so I feel the need to explain even at the risk of losing few readers with this long and winded post.  As few of you might know I have been struggling with my professional life for few years.  My decision to become a pastry chef was an easy one, but it turned out that it is not easy to make a living working in restaurants or bakeries.  Unless a person ends up working in top notch restaurants, the pay is meager, the hours are brutal, the environment not always great.

Finding a mentor, someone who gets you and teaches you tons, wasn't easy.  Fate or chance caused DMG and me to cross paths in 2006, and I am glad we did.  DMG taught me a huge amount, his knowledge is vast, his work ethics amazing, he knew I wanted to learn and I owe him a lot.  After I left the restaurant  where we worked together, I never found anything/anyone even close, the experience of working for one of the best in a way ruined it for me.  Every job after that was not what I was inspiring for, excitement quickly turned into disappointment.   

Two jobs ended soon after they started because the restaurants could not afford to pay me, and at that point I had learned that for me to be happy, the job had to be challenging, providing a good learning curve, and most importantly, I have to work for someone I trust and respect.   Trust and respect, two things I need to be happy. 

Fast forward to 3 weeks ago, things changed.  I have been in contact with a bakery since December, I started a Master Gardener program,  I got a job offer at a new local restaurant, two catering gigs, and no time for this blog any more.  I took the job offer but decided to follow up on the bakery job because deep down I knew I would be happier there.  The restaurant job was in my town, but the space was not designed with pastry production or even pastry service in mind, it quickly became clear that there was no way we could produce all the things they wanted to make, the dessert menu had to be redesigned fast.

After few frustrating days, the owner decided that for the time being there wasn't going to be any pastry made there, a wise decision since there was no space really.  Luckily I was able to land a second interview and a try out at the bakery, and quickly got a second job offer at this brand new bakery, designed with huge production in mind, a bakery that has amazing possibilities and a great stuff of women who believe in creating a happy work environment.   I have been working there for two weeks, and love being challenged, I am learning lots, and I hope to make a difference.  I see lots of gluten free baking in my future, there is a growing need for GF pastries and no one making them in my area.

During the menu testing phase for the job that wasn't, I made few things for the owner to try,  she wanted American desserts, tasty and innovative.  I thought that brownies would work well, fast and easy to make, easy to store, and something people always love.  I am not a fan of brownies and never tasted one that knocked my socks off, but I was intrigued by the fact that this brownie recipe became an instant hit when Oprah Winfrey featured it on her show, no less.   I realize that this recipe has been out for a while, the book Baked, New Frontiers in Baking was published in 2008, but again, not being a brownie fan I never ached to make them until now.   The sweet and salty recipe comes from  Baked Explorations,  the second book published by Matt Lewis and Renato Poliafito, the two masterminds of the very successful bakery Baked in Brooklyn.  There are two layers of brownie butter sandwiching a layer of salted caramel, perfect for the restaurant, I thought.  When I tasted a piece of these brownies, still warm from the oven, my socks were knocked off, I couldn't stop eating them even with all the gluten.  They were perfection!   I will try a gluten free version asap so I can eat them.

Salted Caramel Pecan Brownies
adapted from Baked, Explorations

For the caramel:
1 cup sugar
2 TBS light corn syrup
1/2 cup heavy cream
1 tsp fleur de sel (I used sea salt)
1/4 cup sour cream

Make the caramel:  In a medium sauce pan with a thick bottom mix together the sugar and the corn syrup with 1/4 cup of water.  Cook over high heat until dark amber in color (about 350F).   Remove from the heat and slowly add the cream, being careful as it will bubble up, then add the salt. Whisk in the sour cream and set aside to cool.

For the brownies:
1 1/4 cup flour
1 tsp salt
2 TBS dark unsweetened cocoa powder (like Valrhona)
11 oz. good quality bittersweet chocolate (60-72%), chopped
8 oz butter, cut in 1" cubes
1 1/2 cups sugar
1/2 cup firmly packed light brown sugar
5 large egg, at room temperature
2 tsp vanilla extract
1 cup chopped pecans

Pre-heat the oven to 350F.  Butter the bottom and the sides of a parchment paper lined metal 9x13" pan.  Mix together the flour, cocoa powder and salt set aside.  Melt the chocolate and the butter together in a double boiler.   Keeping the chocolate mixture over the water add both sugars and whisk until well combined.   The mixture should be at room temperature.  Add three eggs to the chocolate mixture and whisk until just combined.  Add the remaining eggs and the vanilla extract and mix just until combined.  Too much mixing will make the brownie cakey.   Sprinkle the flour mixture over the chocolate.  Fold the dry ingredients into the chocolate mixture until there is just a trace of the flour.

For the assembly:
Pour half of the brownie mixture into the prepared pan and smooth it with a spatula.   Pour 3/4 cup of the prepared caramel over the brownie.  Spread it with a spatula making sure it doesn't touch the side of the pan or it will burn.  Pour the chopped pecans over the caramel and press lightly.  Pour the rest of the brownie butter over the caramel and spread with a spatula.  Bake for about 30 minutes until a cake tester comes out clean.  Cool completely before cutting.  Freeze well.

Notes:  I used all the caramel sauce on the brownies, and it worked as well, but make sure the sauce is cool so it doesn't spread too much.  The pecans are my addition, pecans and caramels are made for each other I think.  The book calls for sprinkling 1 1/2 tsp fleur de sel and 1 tsp of coarse sugar over the brownies as they come out of the oven.  I didn't do this step so my brownies were not as salty as the original recipe, but please do so if inclined.


Tuesday, January 17, 2012

Harvest (cup)Cake-Tasty and Super Healthy


Why am I proposing this cake in the middle of winter you might ask?  Well, as much as I try to only eat what is in season, zucchini are hard for me to give up, plus this cake is so tasty I didn't want to wait until September to post about it.  If you are inclined to only use seasonal ingredients I would imagine that parsnips could be substituted for the zucchini, I bet they would taste great.  If you have followed this blog for a while you know that I gave up gluten a little bit over a year ago.  Yes, and my profession is pastry chef, pretty ironic, right?   It has been a sad year for my baking as I had quite few baking disasters when I tried to convert  recipes containing gluten.  I learned that is not that simple, using gluten free flour doesn't always give you the results you want, and tweaking the recipes takes time.  Since I have a big sweet tooth I love to eat something sweet every day so I have been trying to master few recipes I can count on. Luckily there are so many wonderful gluten free sites and blogs so I have plenty of inspiration.  I have now accumulated a great deal of recipes, some I tried and some are in my recipe holder waiting for inspiration.  This cake was one I decided to try even if it meant to use zucchini not grown in California, it looked delicious. 

The cakes comes from the recently discovered blog Roost. I found this blog not because of the gluten free contents, but because of the stunning styling and photographs, I hope you go and take a look.  Caitlin/Coco, the super talented author, and her husband embarked in a dietary adventure for health reasons and one of the thing they eliminated from their diet was gluten.  Needles to say, I am in heaven when I read her blog.

This cake caught my eyes and made me salivate enough that I decided to try it.  It is wholesome, sweetened with honey, uses almonds as the bulk ingredients, which one of my favorite nuts, and has three cups of fruit and veggies.  I tried it and loved it, so after asking permission to post it here, I am now encouraging you to try it.  If this is not your cup of tea, try to make it for a friend who is gluten intolerant, she/he will thank you.

The cake is good without topping but if you would like to dress it up please try the topping as well, it is the most delicious and natural thing I have tried in a long time.  Cashews, honey, and dates are the main ingredients, and it is so good I wanted to eat it with a spoon, give it a try.

If you know me, you also know that I love sweet things to be small, they are much cuter, and you don't feel guilty eating two or four, plus I wanted to know how this cake would work in a mini form.  The verdict...it is even better, it is a tad drier and cooks super fast. 


The recipe calls for leaving the apples in chunks, but a trusty taster friend of mine suggested to cut the apples smaller, so do so if you want.  I like the chunky texture.  I used canola oil in the cake, something I usually don't like, but there not much of it and the other flavors cover it up.

Below find the recipe as written by Caitlin.

Harvest Cake (Makes 1-9inch cake)
  • 3 cups almond flour
  • 1 1/2 tsp baking soda
  • 1/2 tsp salt
  • 1 1/2 tsp cinnamon
  • 1/4 cup ghee (or oil of your choice) if you use ghee make sure it is melted
  • 1/4 cup honey
  • 1 1/2 tsp pure vanilla extract
  • 3 eggs
  • 1 cup grated carrot
  • 1 cup grated zucchini
  • 1 cup chopped apple
Preheat oven to 350F. Grease a 9inch cake pan (you can use a regular cake pan if you prefer, not the fluted one pictured above). In a bowl combine dry ingredients. In a separate bowl combine wet ingredients. Pour wet mixture into the dry mixture and stir to incorporate. Pour into prepared cake pan and cook in oven for 40-45 minutes or until a toothpick inserted into the center comes out clean.

Vanilla Cream (makes almost 2 cups)
  • 1 cup raw cashews, soaked for three hours, water discarded
  • 1/2 cup fresh apple juice
  • 2 Medjool dates, pitted
  • 1 TBS honey
  • 1 vanilla bean, seeds scraped and pod discarded
In a high speed blender combine ingredients until very smooth. Spread on cake or muffins.
Cake can be stored in an airtight container at room temperature for 4 days or in the fridge for 1 week.

Other gluten-free cakes....
Orange cake with chocolate glaze
Fig hazelnut tart
Cherry almond cake


Monday, January 9, 2012

DHSPC #5-Creamy Cauliflower Soup


The result

In case you didn't know, I am a total Donna Hay's fan, willing to spend $10 a month to get my hands on her magazine.  I just realized I missed last month's magazine, I think my local store stopped carrying it, I better find it soon as it has lots of cookies in the front.  I love her magazine and books, and I have cooked from them quite a bit, with great success.  Her cooking is simple, most recipes only have few ingredients, and are easy to make.  But more than anything I love the photos on her magazine, they make you drool, they make you want to become a food stylist and photographer, they make you want to bake.

I love Simone's DH styling and photography challenge, it pushes me out of my comfort zone.  Every month Simone, the author of the gorgeous blog Jungle Frog Cooking, has chosen something very different, not only as a food choice but as a study on styling and photography.  I actually participated to last month's challenge but I struggled with the pictures, run out of time because of the holidays,  so I never put up a post.  The recipe was really tasty, mini corn cakes with prosciutto and sage, to see the photos that were submitted check Simone's post.

This month I am early, getting it out of the way right away.  This month's challenge is a wonderful creamy cauliflower soup,  published in Donna Hay Magazine issue #51, which I don't have.    The soup was really tasty, and not too heavy, you can find a printable version in Simone's post. I only made a half batch and it was plenty for four people, maybe Australians are big eaters....  Below you can see the photo, shot by Ben Dearnley, that we were challenged to replicate.  The colors are beautifully dark, mostly black, the light comes from a 1:30 direction and doesn't seem to be bounced, so the bottom left, the opposite corner from the light, is pretty dark.  The styling is rather simple, but it highlights the light color of the soup and the delicious topping. 

The Challenge

Now for the creative process...I noticed that the light was coming from 1:30/2 o'clock, and it wasn't from a huge source, notice the white reflection on the bottom surface, the top left part is darker, how they did that I am not sure.  The light, which doesn't seem diffused, is reflecting on the black fabric,  on the top left corner, creating a whitish hue, something that I noticed other times I photographed black backgrounds, sometimes it ruins the picture, in this case it lighted the overall composition.   That gave me another clue on where the light came from.  The light looks natural to me, but impossible to know.  I have no clue on how they got that whitish patina on the photo, maybe they used a high ISO setting?   I will never know.

I was able to find all the right props in my house, incidentally I bought the black table set in December because I love dark moody photos so I wanted something really dark to showcase the food.


Below is a series of photos I took, all in manual mode, the camera was set on sun light, low ISO that were increased with the last photo to 400, and I used a tripod, with a 2 second delay so the camera wouldn't shake.    Big aperture was f5 (I can't go lower than that with my camera), and different shatter speed depending on the time of the day.


This picture was taken early morning, the light was bright, but the color were all wrong, and the light reflected too much on the soup and the spoon.  I decided to wait.  The angle of the camera was also wrong, too high.


Early afternoon,  sun was too high in the sky, it created even more reflection on the soup, something the original photo didn't have.  I decided to wait again.


Once the sun went being a big redwood tree I knew I hit the jackpot, however the camera read the new light differently and imparted a bluish hue.  I didn't change the camera settings, I just adjusted the color on i-photo.  The light was coming from the right direction but wasn't harsh any more nor created too much reflection.
 This picture was taken early morning, the sun was still really low and the same bluish hue was seen, I love it but it was not real nor close to the original photo.


Simone would love if any of you joined this group so if you are inclined please follow this link for the how to.

Sunday, January 8, 2012

Using up Pantry Items #2-Chicken Broth

Few simple ingredients

This is not rocket science, nor Iron Chef's material, but if you never had home-made chicken broth you don't know what you are missing.  My maternal grandmother was the queen of chicken broth.  If I close my eyes I can see her sitting at her marble table, eating a bowl of piping hot chicken broth with some little pastina floating inside.  It was also a favorite of mine.  We even had our own private game, I would go downstairs to her apartment and ask if I could have "la solita", or the usual one, because it was a typical hospital food and I must have tasted it during one of her hospital stays.  I miss my nonna Anita, although she was a stern woman, and lost her mother was she was young and had to help rise her siblings, I knew she loved me deeply.

Wasn't she beautiful?


There is no comparison between a store-bought chicken broth and the one that you can make at home with little effort and few ingredients.  Next time you eat a whole chicken save the carcass (and some of the other bones if you want), add an onion, two carrots, a stalk of celery, few stems of parsley, cover with cold water and bring to a simmer.  Simmer covered for two hours, discard the solids and cool.  To remove all the fat, chill overnight in the refrigerator and remove all the coagulated fat from the top.  Simple and delicious!

Simmering

To keep with my only new year's resolution, I used things I had on hand and made this broth for the next dish I am working on, so stay tuned!

Yum!


Thursday, January 5, 2012

Lentils with Roasted Delicata Squash-aka Using up Pantry Ingredients #1


In the previous post I mentioned how I tend not to make new year's resolutions.  Well scratch that, I just made one!  While doing some much needed after-the-holidays cleaning, I saw the mess in my pantry took stock of my pantry ingredients, and noticed how many items I have accumulated.  One thing you might not know about me is that I am a compulsive buyer, I see something that tickles my cooking brain and buy it (well...except for things that are over-prized as I am a "cheap" compulsive buyer).  Then life takes over, the item goes into the pantry, and I often forget  about it, and sometimes I end up finding the item when it has pasted its prime so it goes into the compost (not really green, isn't it?)   Wishing to spend money more wisely this year, and decrease the waste, I decided to not buy any more ingredients until my pantry is completely clean, which will take a while I imagine.  I then thought that it would be a great way to start the year blogging the dishes I make with those ingredients, which are for the most part really healthy.  


I started with lentils, a great favorite of mine, a powerful ingredient, and versatile too.   Since I also had a wonderful delicata squash on hand, I used that one up as well. 

Not such a great photo of a beautiful squash

I love making lentils and eating them with roasted squash, so here is the first dish of the year.  I am sure most of the dishes I will make will not be new to you, but if I can introduce some new great healthy ingredients, or a new way of cooking them,  my life as a blogger will be fulfilled.


I wish the photos were better, I took the photos at different times of the day and in different light conditions.   I need to learn how to be more professional and set up a photo shoot so I can take pictures at the same time.  That could be another new year's resolution, don't you agree?

Enjoy!


Lentils with Roasted Delicata Squash

1/2 cup lentils (I used the little french lentils)
1 medium delicata squash (or any other squash you prefer)
Sage leaves, chopped fine
3 TBS extra virgin olive oil
Salt and pepper to taste
Smoked cheese of your choice to grate on top (I used mozzarella)

Pre-heat oven to 375F.  Cook the lentils in plenty of water until tender (with lentils is not necessary to soak them overnight, but if you are inclined to do so they will cook faster).
While the lentils are cooking, cut the squash lengthwise (delicata squash doesn't need to be peeled), remove the seeds and cut in slices.  Roast until soft.  
Drain the cooked lentils and sauté them with 1 TBS olive oil, add salt to taste.
Sauté the squash slices with 2 TBS of olive oil, the chopped sage leaves, and salt and pepper to taste.
Mix the lentils with the squash and top with some smoked cheese if you are using it (amount is personal, I used about 2 tablespoon).
Makes two servings.

Sunday, January 1, 2012

Happy New Year and Few Wishes

One of the advantages of being an early riser is to be able to witness the most magnificent sunrises, the one photographed below was breathtaking, the colors were spectacular.  I talked about the West Point Inn before.  This century-old inn is located on Mount Tamalpais, is reachable only by foot or bikes, and has the most amazing views of the San Francisco Bay.  It was build for people coming up with a gravity cable car which has long been dismantled, and luckily  for us it has survived for all of us to enjoy.  I recently spent two nights up there with my family and a group of friends.  We cooked, we laughed, we hiked, we had meaningful conversations.  Life is good


I am wary of making New Year's resolutions because I rarely keep them, but I can't stop wishing.  My big wish  for myself is to find a meaningful and fulfilling job this year.  A job where I can use my creativity, be challenged and also have fun. 

I wish my readers a year full of meaning, happiness, and peace.  If you wish to share your wishes for this new year please add them in your comments.


My wish for the earth, this magnificent place we inhabit, is that people and their leaders will wake up and realize that we need to slow down our depleting of natural resources, use less, re-use, and re-purpose more.  I wish all my readers would make few changes in their lives, even small, to use less plastic, eat less meat, use less energy, and spread the word with their actions.

Be well!


LinkWithin

Related Posts with Thumbnails