Showing posts with label Christmas. Show all posts

Thursday, December 22, 2011

Red Onion Jam


I can't believe I haven't posted in almost three weeks, where did the time go?   The last two weeks have been intense, on many levels.  Three of our new chickens turned out to be roosters, which is something  I had to deal with, why were the odds against us?  One of our chicken was killed by a hawk, luckily she wasn't one of our favorites, but it was traumatic nonetheless, it also meant that netting had to be installed.  I worked in my house, trying to organize office space, magazines, craft items, it is a never ending story, I wish I was born a natural organizer and a minimalist.  We also had a birthday party in the family, and a catering gig, which went really well.  I also decided to be tested for celiac disease, which will be confirmed in a week or so, but the process took two days, not fun either.  I have two more posts I would try to get done by the end of December, hopefully I will make it.  Phew, how do the great bloggers out there do it?


If you are still looking for homemade Christmas gifts, you can find great inspiration everywhere in the web these days.  For many it is a time of frugality, for others it is the desire of making something by hand, a tradition that is disappearing but also kept alive by many.  Giving something home made  represents the desire to acknowledge the people who make my life great with their work or presence, and since cooking is the thing I do best, that is the craft of my choice.  I have been making Christmas cookies for years, a tradition started more than ten years ago, but sometimes I find inspiration elsewhere, one year I made chocolate fudge.  This year the cookies may not make it, I don't know if I will have the time, that's why this marmalade is perfect, it came together fast, it was easy to make, and is delicious.  The only drawback is the eye stinging, so make it on a day you can open the kitchen windows and let the air in.  I wore swim goggles while cutting the onions, imagine that!

I always thought of marmalade as a citrus fruit preserve, but according to Blue Chair Jam Cookbook and the Merriam-Webster dictionary, a marmalade is a jelly with pieces of fruit and fruit rind present.  Why this preserve qualifies as a marmalade I am not sure, but the book where I found the recipe, Preserve It!, calls it a marmalade so I will stick to the term.   I love this book because it is not just about jams or marmalade,  but has instructions on how to preserve almost everything edible, even in the freezer.

Happy Holidays to all of you!

Red Onion Marmalade
Makes about 2 medium jars

Ingredients
2 TBS extra virgin olive oil
2 1/4 lbs-1 kg red onions, peeled and sliced
pinch of salt and freshly grated pepper
1/2 cup red wine
3 TBS balsamic vinegar
3 TBS white wine  vinegar
6 TBS light brown sugar

Heat the olive oil in a large heavy-duty stainless steel pan.  Add the onions, the salt and some black pepper.  Cook on medium low for about 30 minutes, until the onions soften and turn translucent, stirring occasionally so they don't stick, slow cooking is essential for the caramel taste to develop.  Raise the heat a little, add the vinegars and stir to combine.  Bring to a boil, add the sugar and cook, stirring occasionally for another 30-40 minutes until most of the liquid has evaporated.  Remove the pan form the heat, taste and adjust the seasoning as necessary.  Spoon into warm sterilized jars with a non metallic or vinegar-proof lid.  Store in the fridge to allow the flavors to mature for few weeks.  Keep refrigerated.

Enjoy!

Here are few more ideas for this Christmas season:

Almond sticks with cocoa nibs
Blood orange caramels with almonds
Chocolate thumbprints cookies
Congo brownies
Korova cookies
Pecan shortbread cookies
Sunflower ginseng macarons

Monday, November 14, 2011

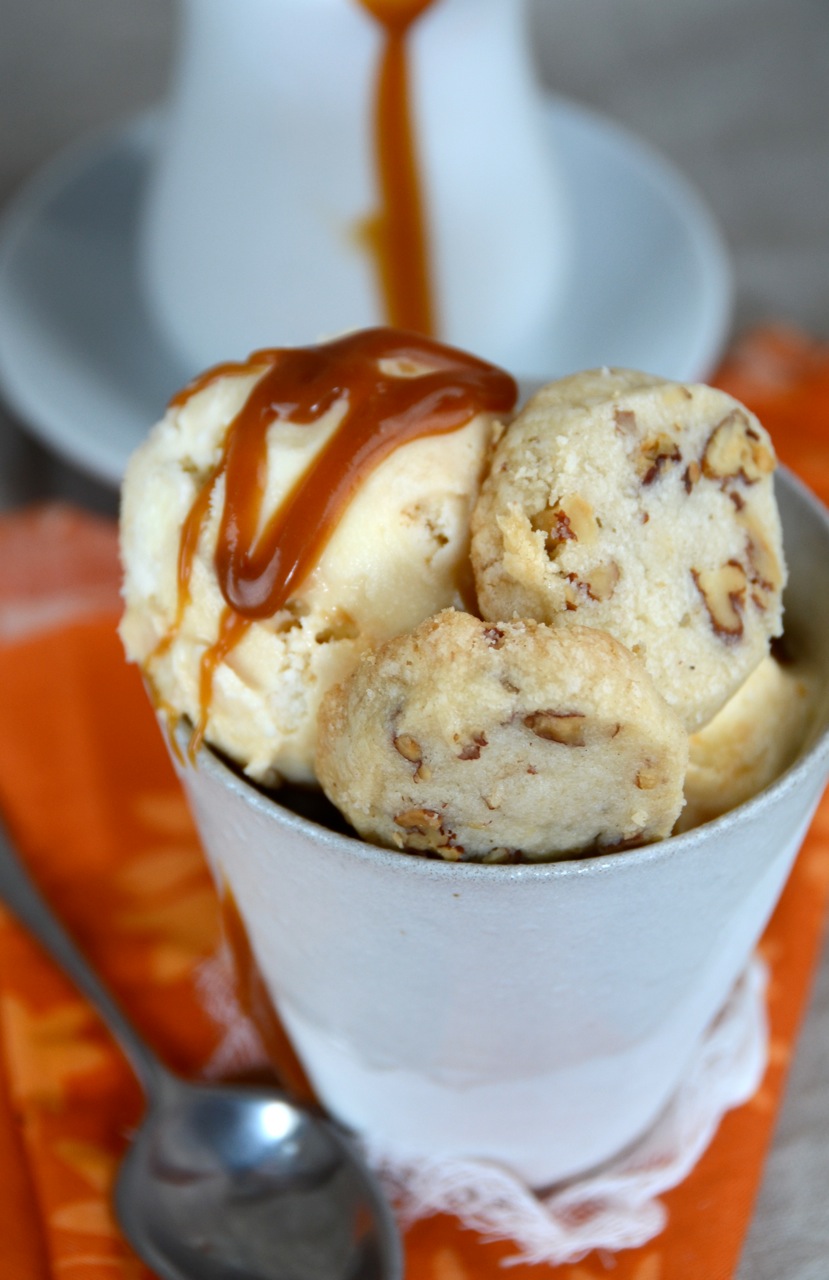
Pear Caramel Ice Cream with Pecan Shortbread Cookies


The hunt for new Christmas cookie recipes has started.   I love giving bags of cookies to friends and family and to make it fun I try new cookies every year.  My stack of Christmas cookie magazines increases every year, so does the list of delicious cookies I tried.   I like to choose cookies that have interesting texture and color so when paired together they visually please the eyes.  I love making small cookies, almost like miniature, so you can taste more than one and don't feel guilty.  These are keepers.


The first new recipe I tried this year comes from the book A Passion for Desserts by Emily Luchetti, a simple and delicious pecan short bread. Emily is the executive pastry chef at Farallon and Waterbar restaurants in San Francisco, and has published many amazing books, and has also been writing a blog for years (which I just discovered, not sure why I didn't find it earlier, she is one my favorite pastry chefs).


I will definitely make these cookies again, they are buttery shortbread cookies, studded with pecans, and they melt in your mouth.  The only drawback is that they are a little too fragile and crumbly, maybe adding a tad less butter would help.  They are not too sweet, and don't they look great as ice cream sandwiches?


Since I had some pears that needed to be used and some left over caramel sauce I decided to try the ice cream recipe that was paired with the cookies in the book.  I used the most amazingly colored crimson pears I have ever seen, which I bought on a whim, just for the color. 

Isn't the color amazing?


The ice cream is delicious, the flavor of the pears is intense, and the swirls of caramel bring it to a different realm.  However I decreased the sugar by a 1/4 cup and it was still too sweet, maybe it was the omission of the pear liquor, which Emily adds in the recipe but I didn't.   The ice cream  was perfect paired with the cookies since they are really not sweet at all.


You can find another pear ice cream recipe from David Lebovitz clicking on the link.


Pear-Caramel Swirl Ice Cream
adapted from Passion for Desserts

Six ripe pears (about 3 pounds)
3/4 cup plus 1/3 cups sugar
1 tablespoon freshly squeezed lemon juice
6 large egg yolks
1/8 teaspoon salt
2 cups milk
2 1/2 cups heavy whipping cream
1 cup cold Caramel Sauce

Peel, halve, and core the pears.  Slice them 1/2 inch stick.  Cook the pear slices, 1/3 cup of the sugar and the lemon juice over medium heat, until the pears are soft and the juices have evaporated.  Let cool for 10 minutes and then puree until smooth.  Refrigerate until cold.

In a bowl, whip the egg yolks with 1/4 cup of sugar.  Bring cream to a boil, then pour onto the yolks to slowly temper them until they are thickened into a custard.  Immediately strain and add the cold milk.  Refrigerate until cold.  Stir together the pear puree and the egg custard.  Freeze according to your ice cream maker.   (Note:  the yield is more that my ice cream maker could freeze, so I had to freeze in two batches).

Pecan Cookies
3 1/2 ounces butter, softened
1/3 cup sugar
1/2 tsp vanilla extract
1/2 cup plus 2 tbs all-purpose flour
Pinch of salt
1/4 cup pecan pieces

Beat the butter, sugar and vanilla until smooth, 30 seconds.  Add the flour, salt and pecans.  Mix just until combined.  Roll dough into a log, 1 inch thick, using a sheet of parchment paper.  Chill or freeze until hard.  Pre-heat oven to 325F, cut log into 1/4 inch thick slices, place on a paper lined baking sheet and bake until light golden.  Let cool.


Friday, December 24, 2010

Daring Bakers-Christmas Stollen


I love Stollen! This delicious German sweet belongs to a family of European breads made with eggs, butter, and lots of dried fruit. Panettone and Gubana are other examples, and they probably all generated in the middle ages, when spices, nuts, and dried fruit were used to add nutrition to winter breads. I have made this bread few times when I was in Venice last year, using Whild Yeast Susan's recipe. They were very well received and went quickly. Stollen is normally eaten at Christmas and it represents the blanket the baby Jesus was wrapped in. We were challenged to shape the dough as a wreath, which works really well too.

The 2010 December Daring Bakers’ challenge was hosted by Penny of Sweet Sadie’s Baking. She chose to challenge Daring Bakers’ to make Stollen. She adapted a friend’s family recipe and combined it with information from friends, techniques from Peter Reinhart’s book.........and Martha Stewart’s demonstration.


Sadly I had to give up gluten, so I made this bread but didn't eat it, it was torture let me tell you. I brought it up to the West Point Inn, an amazing place up on Mount Tamalpais, reachable only by foot, where we spent last night. I knew that our friends and their children would love having it for dessert or even for breakfast. We ate it at night and as french toast this morning, delicious! And to make you want to visit San Francisco, here are two pictures of this morning's sunrise, from the Inn, totally priceless!


Amazing views of San Francisco at sunrise


Penny challenged to package the stollen for gift giving so I cooked few mini stollens in these super cute paper molds and gave them as gift to few of my neighbors.

You can find the complete recipe and instructions at the daring kitchen site, but below is just the recipe, edited to make the ingredient list easier to read.

I candied my own peel using the method I normally use, and used grapefruit and lemon peel since that is what I had at home.

I made few changes to the recipe, first in the mixing. I omitted 3 ounces of flour to the dough as the original 27 ounces seemed too much, I prefer a wetter dough in general, plus you can always add more flour if it is not enough. The amount I used, 24 ounces, worked well. Then I didn't add the butter until after the gluten started developing. Fat inhibits gluten development, by adding the butter slowly after the dough has been mixed a while you create a softer, more elastic dough. I used cranberries instead of the raisins to make the bread even more festive (the Germans don't use cranberries as they are a Northern American fruit), and didn't use the cherries the recipe suggests. Last change was in the spice, I used ground cardamom instead of the cinnamon, because it goes so well with the citrus flavor.

Stollen Wreath

Makes one large wreath or two traditional shaped Stollen loaves.
Serves 10-12 people

Ingredients

1/4 cup (60ml) lukewarm water (110º F / 43º C)
2 packages/4.5 teaspoons/14 gr/.5 oz active dry yeast
1 cup milk
5 oz/10 tablespoons/140 gr unsalted butter
5.5 cups/27 oz/770 gr all-purpose flour
½ cup/115 gr sugar
3/4 teaspoon/4.5 gr salt
1 teaspoon/6 gr cinnamon
3 large eggs, lightly beaten
Grated zest of 1 lemon and 1 orange
2 teaspoons/10 ml vanilla extract
1 teaspoon/5 ml lemon extract or orange extract
3/4 cup/4 3⁄4 oz/135 gr mixed peel
1 cup/6 oz/170 gr firmly packed raisins
3 tablespoons/45ml rum
12 red glacé cherries (roughly chopped) for the color and the taste. (optional) I didn't use them
1 cup/3.5 oz/100 gr flaked almonds
Melted unsalted butter for coating the wreath
Confectioners (powdered) sugar for dusting wreath

Directions

Soak the raisins
In a small bowl, soak the raisins in the rum (or in the orange juice from the zested orange) and set aside. See Note under raisins.

To make the dough

Pour 1⁄4 cup (60 ml) warm water into a small bowl, sprinkle with yeast and let stand 5 minutes. Stir to dissolve yeast completely.

In a small saucepan, combine 1 cup (240 ml) milk and 10 tablespoons (150 ml) butter over medium - low heat until butter is melted. Let stand until lukewarm, about 5 minutes.

Lightly beat eggs in a small bowl and add lemon and vanilla extracts.

In a large mixing bowl (4 qt) (4 liters) (or in the bowl of an electric mixer with paddle attachment), stir together the flour, sugar, salt, cinnamon, orange and lemon zests.

Then stir in (or mix on low speed with the paddle attachment) the yeast/water mixture, eggs and the lukewarm milk/butter mixture. This should take about 2 minutes. It should be a soft, but not sticky ball. When the dough comes together, cover the bowl with either plastic or a tea cloth and let rest for 10 minutes.

Add in the mixed peel, soaked fruit and almonds and mix with your hands or on low speed to incorporate. Here is where you can add the cherries if you would like. Be delicate with the cherries or all your dough will turn red!

Sprinkle flour on the counter, transfer the dough to the counter, and begin kneading (or mixing with the dough hook) to distribute the fruit evenly, adding additional flour if needed. The dough should be soft and satiny, tacky but not sticky. Knead for approximately 8 minutes (6 minutes by machine). The full six minutes of kneading is needed to distribute the dried fruit and other ingredients and to make the dough have a reasonable bread-dough consistency. You can tell when the dough is kneaded enough – a few raisins will start to fall off the dough onto the counter because at the beginning of the kneading process the dough is very sticky and the raisins will be held into the dough but when the dough is done it is tacky which isn't enough to bind the outside raisins onto the dough ball.

Lightly oil a large bowl and transfer the dough to the bowl, rolling around to coat it with the oil. Cover the bowl with plastic wrap.
Put it in the fridge overnight. The dough becomes very firm in the fridge (since the butter goes firm) but it does rise slowly… the raw dough can be kept in the refrigerator up to a week and then baked on the day you want.

Shaping the Dough and Baking the Wreath

1. Let the dough rest for 2 hours after taking out of the fridge in order to warm slightly.
2. Line a sheet pan with parchment paper.
3. Preheat oven to moderate 350°F/180°C/gas mark 4 with the oven rack on the middle shelf.
4. Punch dough down, roll into a rectangle about 16 x 24 inches (40 x 61 cms) and 1⁄4 inch (6 mm) thick.
Starting with a long side, roll up tightly, forming a long, thin cylinder.
Transfer the cylinder roll to the sheet pan. Join the ends together, trying to overlap the layers to make the seam stronger and pinch with your fingers to make it stick, forming a large circle. You can form it around a bowl to keep the shape.
Using kitchen scissors, make cuts along outside of circle, in 2-inch (5 cm) intervals, cutting 2/3 of the way through the dough.
Twist each segment outward, forming a wreath shape. Mist the dough with spray oil and cover loosely with plastic wrap.

Proof for approximately 2 hours at room temperature, or until about 11⁄2 times its original size.
Bake the stollen for 20 minutes, then rotate the pan 180 degrees for even baking and continue to bake for 20 to 30 minutes. The bread will bake to a dark mahogany color, should register 190°F/88°C in the center of the loaf, and should sound hollow when thumped on the bottom.

Transfer to a cooling rack and brush the top with melted butter while still hot.
Immediately tap a layer of powdered sugar over the top through a sieve or sifter.
Wait for 1 minute, then tap another layer over the first.
The bread should be coated generously with the powdered sugar.
Let cool at least an hour before serving. Coat the stollen in butter and icing sugar three times, since this many coatings helps keeps the stollen fresh - especially if you intend on sending it in the mail as Christmas presents!

When completely cool, store in a plastic bag. Or leave it out uncovered overnight to dry out slightly, German style.

Wednesday, December 22, 2010

Christmas Cookies-Just a Few...


I started making cookies for Christmas years before I changed my career from science to pastry. Maybe I was already moving in that direction, who knows. I grew up eating tea cookies in Italy, there are so many types, and many have either almonds or hazelnuts in them. I love to recreate the look and taste of those little morsels, and to lean new recipes from around the world.

Linzer Cookies

Every year I can't help but buy one of the cookie publications that come out just for Christmas, as a result I have a huge collection of recipes, some that I may never try, and they are all over the place. Recently though I started moving all the cookie recipes I make over and over into a little binder so I know where they all are. I am looking forward to adding to it years after years.

Checkerboard Cookies

This year I have made the cookies you see here, some are gluten free for my friends who don't eat gluten, and for me as well (being gluten free for a month, more on another post....).

Chocolate macaron/Coconut macaroons/Marasche

By far the recipe I have made the most is Dorie Greenspan's Korova cookies. I first saw them in her beautiful book Paris Sweets, then realized they are probably the best known cookies in cyberspace, even renamed World Peace Cookies because they induce such bliss and pleasure that the world would be a different place if we all ate them (I wish it were so simple...). I used to sell these cookies at a local farmers' market and they always sold out, I still get orders once in a while. The expression on people's faces when they first taste them is priceless, some sounds I heard cannot be repeated here, if you know what I mean....

Korova Cookies

If you google Korova cookies you get 13,600 links, if you google world peace cookies you get 848,000 (and if you google world peace only, the search engine puts them second). Incredible, isn't it? If you are still not convinced try them, they are amazing!

Use only the best quality of cocoa powder and chocolate, it makes a huge difference, and don't use regular salt, otherwise you lose the contrast of the two flavors.

Korova Cookies
a.k.a. World Peace Cookies
adapted from Dorie Greenspan

Ingredients

5 1/2 oz-150 gr butter, softened
2/3 cup-120 gr brown sugar, packed tight
1/4 cup-50 gr granulated sugar
1 1/4 cup-175 gr all purpose flour
1/3 cup-30 gr cocoa powder (the darker the better, I use Valhrona)
1/2 teaspoon baking soda
1/2 teaspoon fleur de sel or 1/2 teaspoon sea salt
5 oz-150 gr chocolate (use the best quality you can find, at least 64% cocoa)

Method

Pre-sift dry ingredients. Chop chocolate into small pieces. Beat butter and the two sugars until fluffy. Add the dry mixture and the salt. Mix just until the dry ingredients start getting incorporated. Add the chocolate and bring together, without over mixing the dough (the texture will be too tough if the dough is over mixed). Roll into three 12" logs, wrap, and freeze. Makes 1.5 pounds of dough. I normally double the recipe, roll it in six thin logs, and roll each on the short side of a sheet of parchment paper (which is 12"). They keep in the freezer for few weeks. Temper the logs for few minutes at room temperature before cutting thin slices. Bake at 325F until barely set (this is tricky as they are really dark, when you test them they should not be super soft, but still give a little, if they are completely set/hard when you take them out of the oven they are over cooked).

Happy Holiday and Peace to all!

Thursday, December 10, 2009

Hot Fudge-Perfect for the Holidays and Quick too.


I am in a real time crunch this week. We are leaving for Italy (YEAH!) on Monday, I am catering a party this Saturday, AND crazy me decided to still do the farmers' market tomorrow (I am hiring a friend to sell for me though). Every Christmas I make few types of cookies to give as gifts, but this year it is not a feasible proposition. Did I mention that I am also seriously purging the house of all the stuff we don't need any more? That feels good, but it will take a while, and I have piles every where. Jill at Jillicious Discoveries gave me the idea of making something quick and delicious like chocolate truffle sauce, so here I am proposing a recipe different from hers, which I found in David Lebovitz's The Perfect Scoop.


This sauce is very rich, velvety, and chocolaty, perfect for a gift. I found the jars at Cost Plus for $.99 each, always a great source of bargains. They looked too cute so I knew they would work.


Semisweet Hot Fudge

adapted by The Perfect Scoop

1 cup heavy cream
3 oz. unsalted butter
2 TBS light corn syrup
2/3 cup sugar
8 oz. bittersweet chocolate, chopped
1 tsp vanilla extract

Bring all the ingredients, except the chocolate, to a soft boil simmer for 3 minutes. Remove from heat, add the chocolate and let melt for 5 minutes. Whisk until smooth, ladle into the jars, let cool, seal and label. Keeps refrigerated for 2 week.


Notes:
When I make it again, I would decrease the sugar to 1/2 cup (my personal preference for less sweet things), and maybe add a little bit more cream to make it slightly less dense.

LinkWithin

Related Posts with Thumbnails